Developer Guide
![]()
CohortConnect v1.4
Type. Explore. Connect.CohortConnect is an advanced desktop address book which facilitates networking among Computer Science (CS) students. It is optimized for use via a Command Line Interface (CLI) while still having the benefits of a Graphical User Interface (GUI).
With advanced features for managing large groups of contacts, CohortConnect is intended for use in a university setting. At the start of the semester, professors will distribute csv or json files containing a list of students. Instantly load them into CohortConnect with a single Import command. With data collected from students before the semester, our Find A Buddy feature helps you find potential groupmates by leveraging GitHub’s metadata using a proprietary algorithm. In the Events tab, you can identify events and hackathons that your peers will be attending.
Table of Contents
- Table of Contents
- Purpose
- Prerequisites
- Acknowledgements
- Getting Started
- Design
-
Implementation
- Telegram
- Optional Fields
- GitHub
- Favorite command
- Unfavorite command
- Export command
- Import command
- Edit Profile command
- Find command
- Tag command
- Welcome Window
- Profile SetUp Window
- User Profile Window
- Help Window
- User Profile in Menu Bar
- Show command
- Command History (Keyboard Shortcut)
- Switching Between Tabs (Keyboard Shortcut)
- GitHub and Telegram Commands
- Find A Buddy Feature
- Documentation, logging, testing, configuration, dev-ops
- Appendix: Requirements
- Appendix: Instructions for manual testing
Purpose
This guide is intended for current or future developers working on features for CohortConnect, or developers who want to learn more about how CohortConnect is built. It explains the requirements of CohortConnect, the implementation of each individual component, as well as how they are pieced together to execute user commands.
Prerequisites
- General knowledge of Java.
- Object-Oriented Programming.
- UML Notation.
- Basic knowledge of
csvandjsonfile formats. - Basic knowledge of technical terms like
CLI,UI, andJAR. -
Java 11installed on the system.
Acknowledgements
- This project is based on the AddressBook-Level3 project created by the SE-EDU initiative.
- This project uses jackson-dataformat-csv for reading from and writing to CSV files.
Getting Started
Refer to our Quick Start in our User Guide.
Design
Architecture
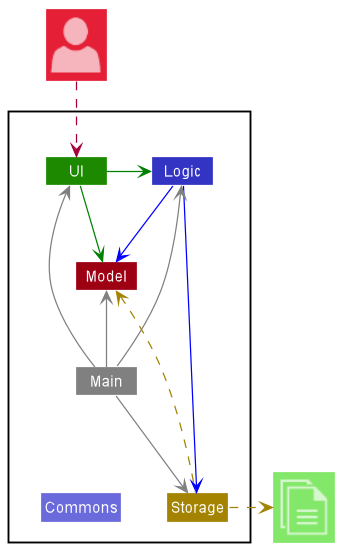
The Architecture Diagram given above explains the high-level design of the App.
Given below is a quick overview of main components and how they interact with each other.
Main components of the architecture
Main has two classes called Main and MainApp. It is responsible for,
- At app launch: Initializes the components in the correct sequence, and connects them up with each other.
- At shut down: Shuts down the components and invokes cleanup methods where necessary.
Commons represents a collection of classes used by multiple other components.
The rest of the App consists of four components.
-
UI: The UI of the App. -
Logic: The command executor. -
Model: Holds the data of the App in memory. -
Storage: Reads data from, and writes data to, the hard disk.
How the architecture components interact with each other
The Sequence Diagram below shows how the components interact with each other for the scenario where the user issues the command delete 1.
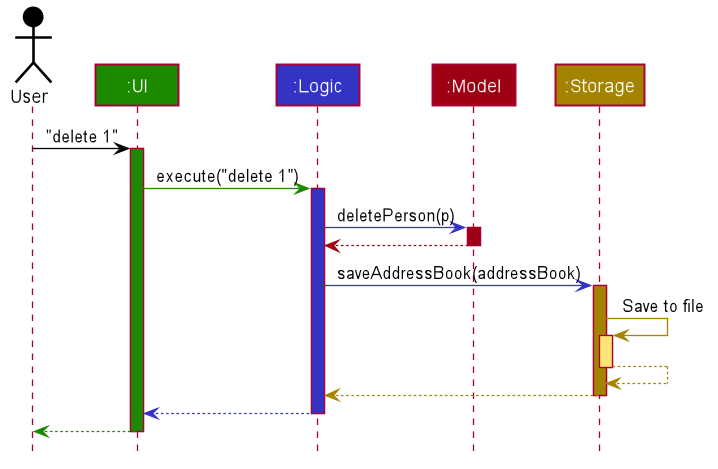
Each of the four main components (also shown in the diagram above),
- defines its API in an
interfacewith the same name as the Component. - implements its functionality using a concrete
{Component Name}Managerclass (which follows the corresponding APIinterfacementioned in the previous point.)
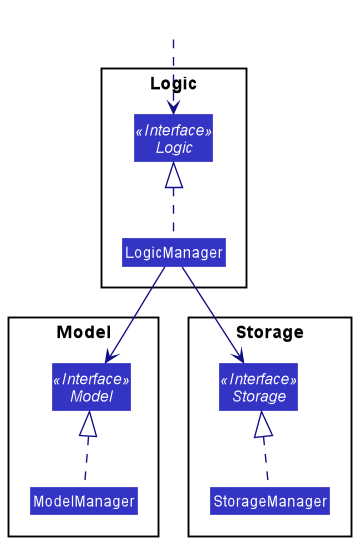
For example, the Logic component defines its API in the Logic.java interface and implements its functionality using the LogicManager.java class which follows the Logic interface. Other components interact with a given component through its interface rather than the concrete class (reason: to prevent outside component’s being coupled to the implementation of a component), as illustrated in the (partial) class diagram below.
The sections below give more details of each component.
UI component
The API of this component is specified in Ui.java
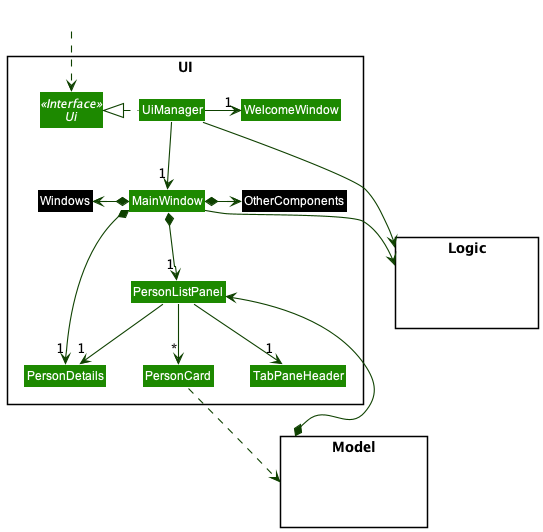
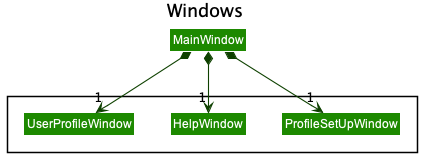
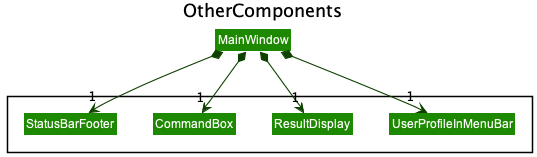
The UI consists of a MainWindow that is made up of parts e.g.CommandBox, ResultDisplay, PersonListPanel, StatusBarFooter etc. All these, including the MainWindow and WelcomeWindow, inherit from the abstract UiPart class which captures the commonalities between classes that represent parts of the visible GUI.
The UI component uses the JavaFx UI framework. The layout of these UI parts are defined in matching .fxml files that are in the src/main/resources/view folder. For example, the layout of the MainWindow is specified in MainWindow.fxml
The UI component,
- executes user commands using the
Logiccomponent. - listens for changes to
Modeldata so that the UI can be updated with the modified data. - keeps a reference to the
Logiccomponent, because theUIrelies on theLogicto execute commands. - depends on some classes in the
Modelcomponent, as it displaysPersonobject residing in theModel.
Logic component
API : Logic.java
Here’s a (partial) class diagram of the Logic component:
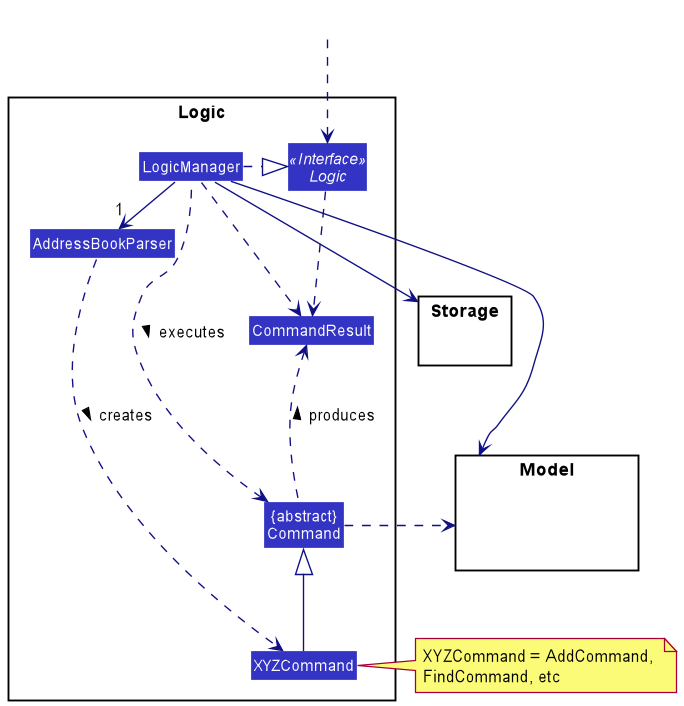
How the Logic component works:
- When
Logicis called upon to execute a command, it uses theAddressBookParserclass to parse the user command. - This results in a
Commandobject (more precisely, an object of one of its subclasses e.g.,AddCommand) which is executed by theLogicManager. - The command can communicate with the
Modelwhen it is executed (e.g. to add a person). - The result of the command execution is encapsulated as a
CommandResultobject which is returned fromLogic.
The Sequence Diagram below illustrates the interactions within the Logic component for the execute("delete 1") API call.
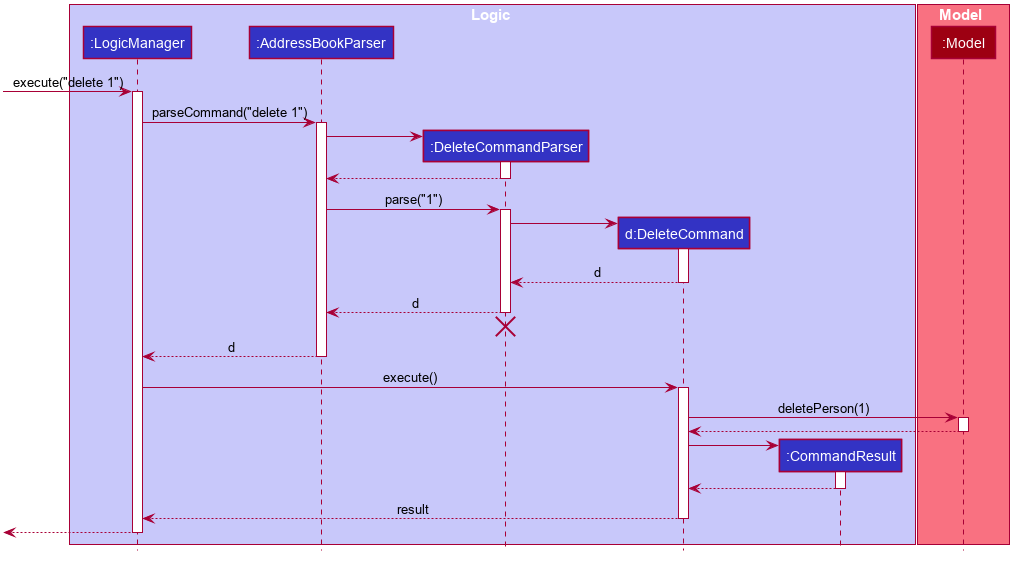
DeleteCommandParser should end at the destroy marker (X) but due to a limitation of PlantUML, the lifeline reaches the end of diagram.
Here are the other classes in Logic (omitted from the class diagram above) that are used for parsing a user command:
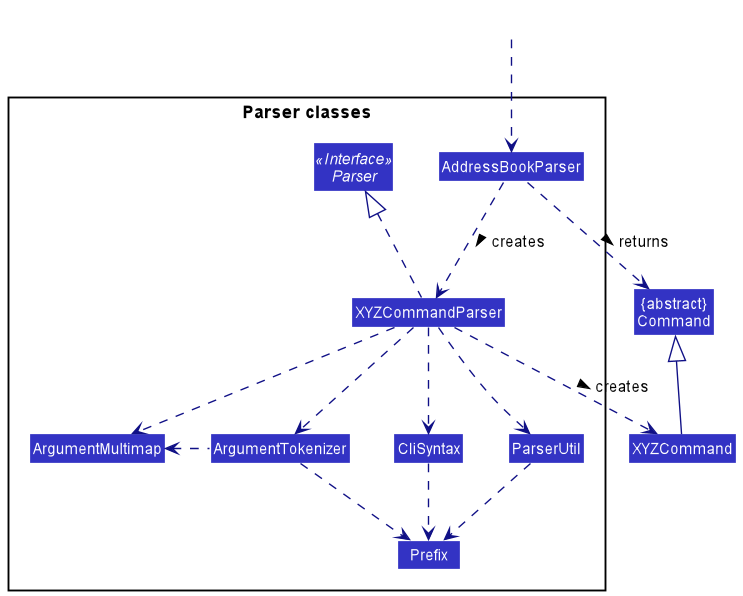
How the parsing works:
- When called upon to parse a user command, the
AddressBookParserclass creates anXYZCommandParser(XYZis a placeholder for the specific command name e.g.,AddCommandParser) which uses the other classes shown above to parse the user command and create aXYZCommandobject (e.g.,AddCommand) which theAddressBookParserreturns back as aCommandobject. - All
XYZCommandParserclasses (e.g.,AddCommandParser,DeleteCommandParser, …) inherit from theParserinterface so that they can be treated similarly where possible e.g, during testing.
Model component
API : Model.java
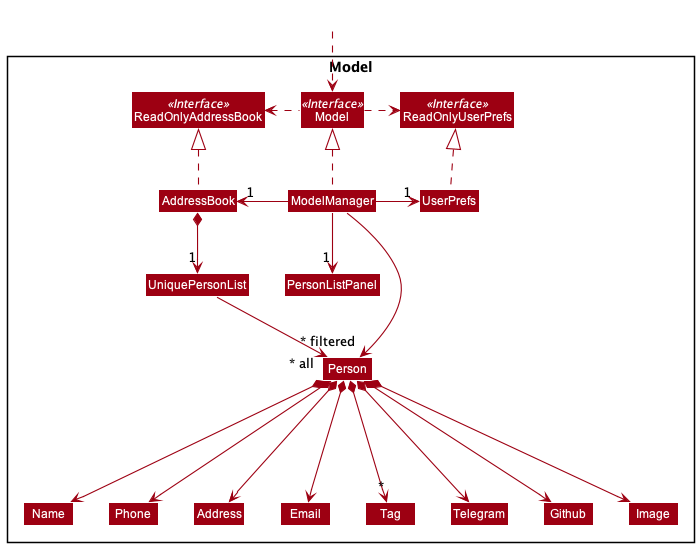
The Model component,
- stores the address book data i.e., all
Personobjects (which are contained in aUniquePersonListobject). - stores the currently ‘selected’
Personobjects (e.g., results of a search query) as a separate filtered list which is exposed to outsiders as an unmodifiableObservableList<Person>that can be ‘observed’ e.g. the UI can be bound to this list so that the UI automatically updates when the data in the list change. - stores a
UserPrefobject that represents the user’s preferences. This is exposed to the outside as aReadOnlyUserPrefobjects. - does not depend on any of the other three components (as the
Modelrepresents data entities of the domain, they should make sense on their own without depending on other components)
Tag list in the AddressBook, which Person references. This allows AddressBook to only require one Tag object per unique tag, instead of each Person needing their own Tag objects.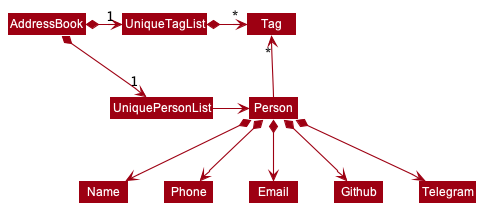
Storage component
API : Storage.java
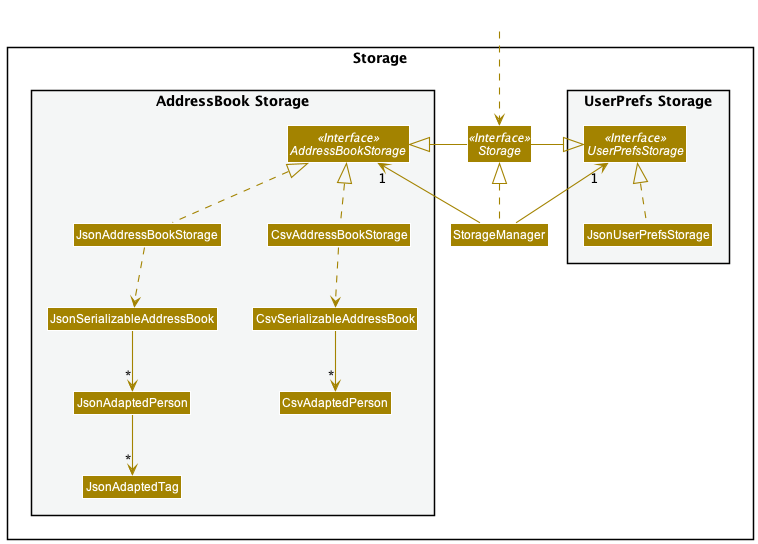
The Storage component,
- saves both address book data and user preference data in json format, and read them back into corresponding objects.
- exports address book data JSON or CSV files.
- imports address book data from JSON or CSV files.
- inherits from both
AddressBookStorageandUserPrefStorage, which means it can be treated as either one (if only the functionality of only one is needed). - depends on some classes in the
Modelcomponent (because theStoragecomponent’s job is to save/retrieve objects that belong to theModel)
Common classes
Classes used by multiple components are in the seedu.addressbook.commons package.
Implementation
This section describes noteworthy details on how certain features are implemented.
Telegram
Implementation
The telegram handle field is facilitated by the Telegram class.
It is stored internally as a String in the data file addressbook.json
and is then initialized as a Telegram object.
The Telegram class implements the following operation:
-
Telegram#isValidTelegram(String test)— Returns true if a given string is a valid telegram handle with the help of a validation regex.
Regex used in verifying the validity of telegram handle:
public static final String VALIDATION_REGEX = "\\w{5,32}";
-
\w— Word. Any word character (alphanumeric & underscore) -
{5,32}— Quantifier. Match between 5 and 32 of the preceding token.
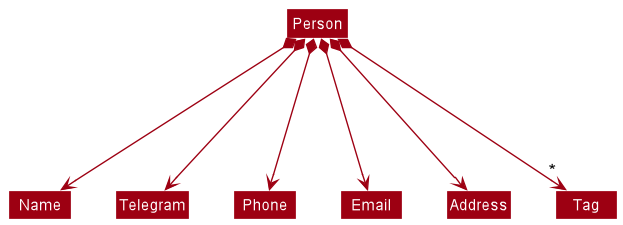
Design considerations
The Telegram class is first integrated into the Person class and added as
a new field to the Person class. This is illustrated by the class diagram below,
where every field, including the Telegram field, is compulsory except the Tag field.
Optional Fields
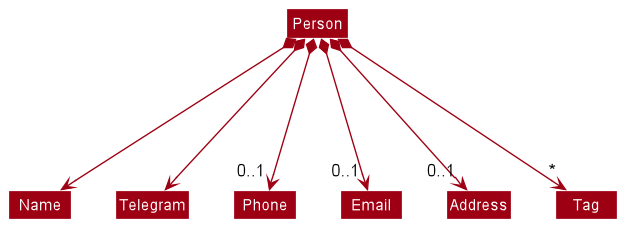
Implementation
The Phone, Email and Address fields are modified such that these fields are
no longer compulsory. The class diagram below illustrates the Person class after
the addition of the Telegram field. The Name and Telegram fields are compulsory
while the rest are optional.
In order to accomodate to the above mentioned new optional fields, the respective constructors were modified such that the following examples are considered valid inputs.
Example 1: Adding new contact without email and address.
add n/John Doe te/@johndoe123 p/98765432
Example 2: Adding new contact without phone, email and address.
add n/John Doe te/@johndoe123
A more interesting input would be as such.
Example 3: Adding new contact without email and address but with empty phone input.
add n/John Doe te/@johndoe123 p/
In such a case, the constructors are modified such that the above input is also deemed
as valid. The rationale behind this is that there is nothing for the VALIDATION_REGEX
to verify, unlike in the following example.
Example 4: Adding new contact without email and address but with invalid phone input.
add n/John Doe te/@johndoe123 p/invalidPhoneNumber
For the case above, the respective constructors will carry out validation on the given input.
Design considerations
In order to allow for optional fields, the AddCommandParser also has to be modified.
In particular, the following methods are modified
-
AddCommandParser#arePrefixesPresent(argumentMultimap, prefixes)— Returns true if none of the prefixes contains emptyOptionalvalues in the givenArgumentMultimap. -
AddCommandParser#parse(args)— Parses the givenStringof arguments in the context of theAddCommandand returns anAddCommandobject for execution. ThrowsParseExceptionif the user input does not conform the expected format.
For the arePrefixesPresent method, the prefixes provided were changed to only
include the following mandatory fields:
PREFIX_NAMEPREFIX_TELEGRAMPREFIX_GITHUB
AddCommandParser#arePrefixesPresent(argumentMultimap, prefixes) uses the static
parsing methods in ParserUtil to parse the different fields in Person.
The individual fields are first initialised with an empty string, which is now
a valid input. The method then calls the arePrefixesPresent method to check if
the provided prefix is present. If present, the method will then call the respective
static parsing methods in ParserUtil.
GitHub
Implementation
The GitHub field is facilitated by the Github class. It is stored internally
as a String in the data file addressbook.json and is then initialized as a
Github object.
The Github class implements the following operation:
-
Github#isValidGithub(String test)— Returns true if a given string is a valid GitHub username with the help of a validation regex.
Regex used in verifying the validity of GitHub username:
public static final String VALIDATION_REGEX = "[a-zA-Z\d](?:[a-zA-Z\d]|-(?=[a-zA-Z\d])){0,38}";
-
[a-zA-Z\d]— Character set. Match any character in the set. -
a-z— Range. Matches a character in the range “a” to “z” (char code 97 to 122). Case sensitive. -
A-Z— Range. Matches a character in the range “A” to “Z” (char code 65 to 90). Case sensitive. -
\d— Digit. Matches any digit character (0-9). -
(?:[a-zA-Z\d]|-(?=[a-zA-Z\d]))— Non-capturing group. Groups multiple tokens together without creating a capture group. -
|— Alternation. Acts like a boolean OR. Matches the expression before or after the sign. -
-— Character. Matches a “-“ character (char code 45). -
{0,38}— Quantifier. Match between 0 and 38 of the preceding token.
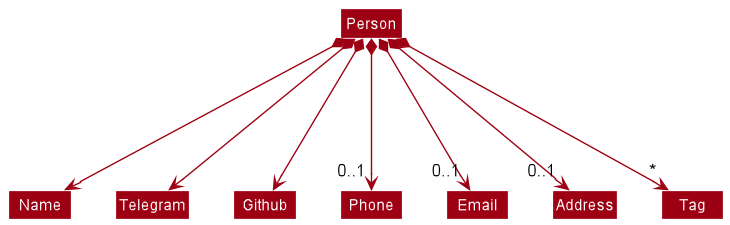
Design considerations
The Github class is first integrated into the Person class and added as
a new field to the Person class. This is illustrated by the class diagram below,
where only the Name, Telegram and Github fields are compulsory.
Favorite command
Implementation
The Favorite command favorites a non-favorited contact from the current list of contacts.
In order to distinguish whether a contact has been favorited or unfavorited,
a boolean flag, an isFavorite field is added into the Person class and
is initialised as false when adding new contacts to the address book.
The following methods are added to Person to help identify and toggle the isFavorite
field within a Person object:
-
Person#isFavorite()— Returns a boolean flag to tell whether thePersonobject is Favorited or not. -
Person#SetIsFavorite()— Sets thePersonobjects’isFavoritefield totrue, which basically favorites the contact of thisPersonobject. -
Person#SetNotIsFavorite()— Sets thePersonobjects’isFavoritefield tofalse, which basically unfavorites the contact of thisPersonobject.
Favoriting contacts is facilitated by the IsFavoritePredicate.
-
IsFavoritePredicatestores a boolean flag for comparison with aPersonobject. - It also has a
IsFavoritePredicate#test(Person person)to determine if thePersoninput into the test is currently favorited or unfavorited.
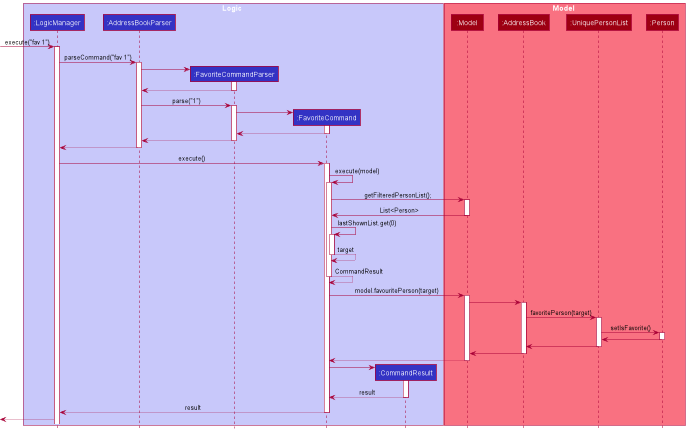
Given below is an example usage scenario and how the FavoriteCommand is executed:
-
Step 1: The user enters favorite command keyword followed by the index
of the contact to be favorited
fav 1. -
Step 2: The
LogicManagerexecutes the input command text calling the methodLogicManager#execute(String commandText). -
Step 3: The
LogicManager#execute(String commandText)method calls the following method fromAddressBookParser,AddressBookParser#parseCommand(String userInput). -
Step 4: Since the command input is a command with description, the command
word
favand argument1is passed intoAddressBookParser#parseCommandWithDescription(String commandWord, String arguments)which creates a newFavoriteCommandParser. -
Step 5:
FavoriteCommandParser#parse(String args)is then called. Since the argument provided here,1, is a valid argument for the favorite command, aFavoriteCommand(1)is returned. -
Step 6: The
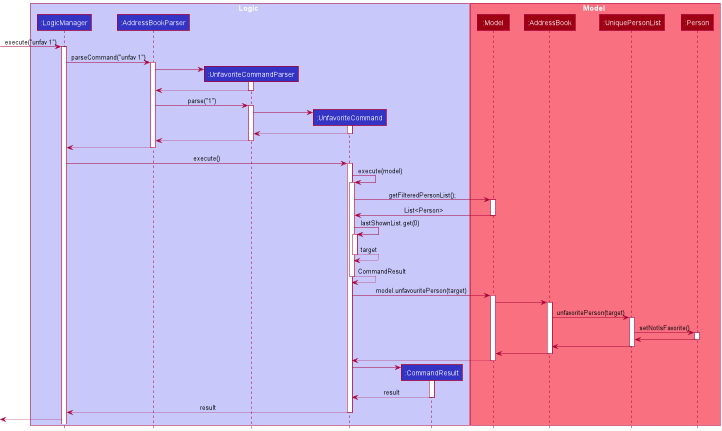
FavoriteCommand#execute(Model model)method is then finally called, favoriting the contact at index1through themodelprovided as input argument by callingModelManager#favoritePerson(Person target).
The Sequence Diagrams below illustrates how the components interact with each other
for the scenario where the user issues the command fav 1.
Design considerations
Aspect: How to keep track of isFavorite
-
Alternative 1 (Current Implementation): Create a boolean flag within
Personclass which signifies that aPersonis favorite iftrueand vice versa.- Pros: Can be easily toggled since the execute method takes in model as arguments.
Model#getFilteredPersonList()retrieves the list ofPerson. The status of the boolean flag can be easily identified byPerson#isFavorite()and easily toggled byPerson#SetIsFavorite()orPerson#SetNotIsFavorite(). - Cons: Increased coupling. The toggling of
isFavoriteshould ideally be handled by another class, similar to the other fields inPersonsuch asGithubandTelegram.
- Pros: Can be easily toggled since the execute method takes in model as arguments.
-
Alternative 2: Create a
Favoriteclass which stores a boolean flag which signifies that aPersonis favorite iftrueand vice versa.- Pros: Reduced coupling. The toggling of
isFavoritewill no longer have to be handled by thePersonclass. This is similar to that of other fields such asGithubandTelegramwhere the contents of the respective fields are handled by their respective classes. - Cons: Does not make sense to create a new class to store a single boolean value.
Unlike other fields which will require validation with the help of a validation regex,
isFavoritecan only hold either atrueorfalsevalue. There is absolutely no need to validate the validity of the boolean values, much less create a validation regex.
- Pros: Reduced coupling. The toggling of
Unfavorite command
Implementation
The Unfavorite command unfavorites a favorited contact from the current list of contacts.
Similar to Favorite command, in order to distinguish whether a contact has
been favorited or unfavorited, a boolean flag, an isFavorite field is added
into the Person class and is initialised as false when adding new contacts
to the address book.
The following methods are added to Person to help identify and toggle the isFavorite
field within a Person object:
-
Person#isFavorite()— Returns a boolean flag to tell whether thePersonobject is Favorited or not. -
Person#SetIsFavorite()— Sets thePersonobjects’isFavoritefield totrue, which basically favorites the contact of thisPersonobject. -
Person#SetNotIsFavorite()— Sets thePersonobjects’isFavoritefield tofalse, which basically unfavorites the contact of thisPersonobject.
Similar to Favoriting contacts, Unfavoriting contacts is also facilitated by the
IsFavoritePredicate.
-
IsFavoritePredicatestores a boolean flag for comparison with aPersonobject. - It also has a
IsFavoritePredicate#test(Person person)to determine if thePersoninput into the test is currently favorited or unfavorited.
Given below is an example usage scenario and how the UnfavoriteCommand is executed:
-
Step 1: The user enters unfavorite command keyword followed by the index
of the contact to be unfavorited
unfav 1. -
Step 2: The
LogicManagerexecutes the input command text calling the methodLogicManager#execute(String commandText). -
Step 3: The
LogicManager#execute(String commandText)method calls the following method fromAddressBookParser,AddressBookParser#parseCommand(String userInput). -
Step 4: Since the command input is a command with description, the command
word
unfavand argument1is passed intoAddressBookParser#parseCommandWithDescription(String commandWord, String arguments)which creates a newUnfavoriteCommandParser. -
Step 5:
UnfavoriteCommandParser#parse(String args)is then called. Since the argument provided here,1, is a valid argument for the unfavorite command, aUnfavoriteCommand(1)is returned. -
Step 6: The
UnfavoriteCommand#execute(Model model)method is then finally called, unfavoriting the contact at index1through themodelprovided as input argument by callingModelManager#unfavoritePerson(Person target).
The Sequence Diagrams below illustrates how the components interact with each other
for the scenario where the user issues the command unfav 1.
Design considerations
Aspect: How to keep track of isFavorite
-
Alternative 1 (Current Implementation): Create a boolean flag within
Personclass which signifies that aPersonis favorite iftrueand vice versa.- Pros: Can be easily toggled since the execute method takes in model as arguments.
Model#getFilteredPersonList()retrieves the list ofPerson. The status of the boolean flag can be easily identified byPerson#isFavorite()and easily toggled byPerson#SetIsFavorite()orPerson#SetNotIsFavorite(). - Cons: Increased coupling. The toggling of
isFavoriteshould ideally be handled by another class, similar to the other fields inPersonsuch asGithubandTelegram.
- Pros: Can be easily toggled since the execute method takes in model as arguments.
-
Alternative 2: Create a
Favoriteclass which stores a boolean flag which signifies that aPersonis favorite iftrueand vice versa.- Pros: Reduced coupling. The toggling of
isFavoritewill no longer have to be handled by thePersonclass. This is similar to that of other fields such asGithubandTelegramwhere the contents of the respective fields are handled by their respective classes. - Cons: Does not make sense to create a new class to store a single boolean value.
Unlike other fields which will require validation with the help of a validation regex,
isFavoritecan only hold either atrueorfalsevalue. There is absolutely no need to validate the validity of the boolean values, much less create a validation regex.
- Pros: Reduced coupling. The toggling of
Export command
Implementation
The Export command exports the current list of contacts to the specified JSON or CSV file, with help from Jackson, an external library. It does not overwrite existing files.
Executing an Export Command can be summarized with the following steps:
- User command is handed over to
ExportCommandParser. After verification of arguments, an ExportCommand is generated. - Upon executing the
ExportCommand, one of the 2 methods are called, depending on the file type specified.ImportCommand#exportAddressBookToJson(ReadOnlyAddressBook)ImportCommand#exportAddressBookToCsv(ReadOnlyAddressBook)
Firstly, the user command is handed over to ExportCommandParser. ExportCommandParser implements Parser<ExportCommand>. It implements the parse() method, which parses the user’s command and returns an ExportCommand with the filename. In parse(), it verifies 3 requirements:
- Arguments are not empty
- Not more than 1 argument
- Filename provided is a .csv or .json file
The Sequence Diagram below illustrates the interactions within the Logic component during the first step of executing execute("export cs2103t.json").
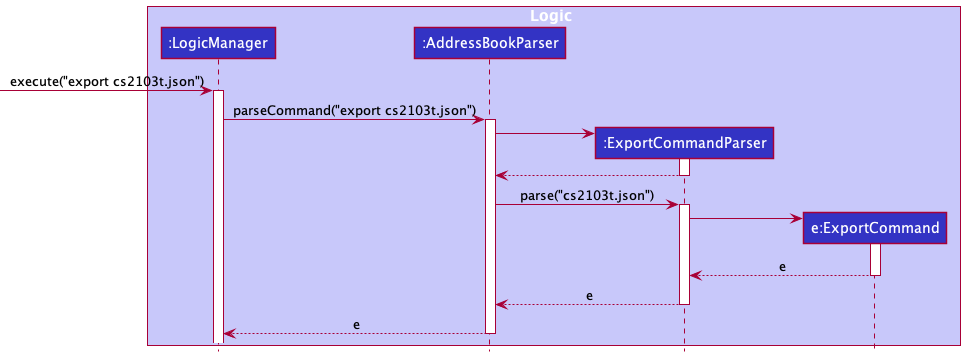
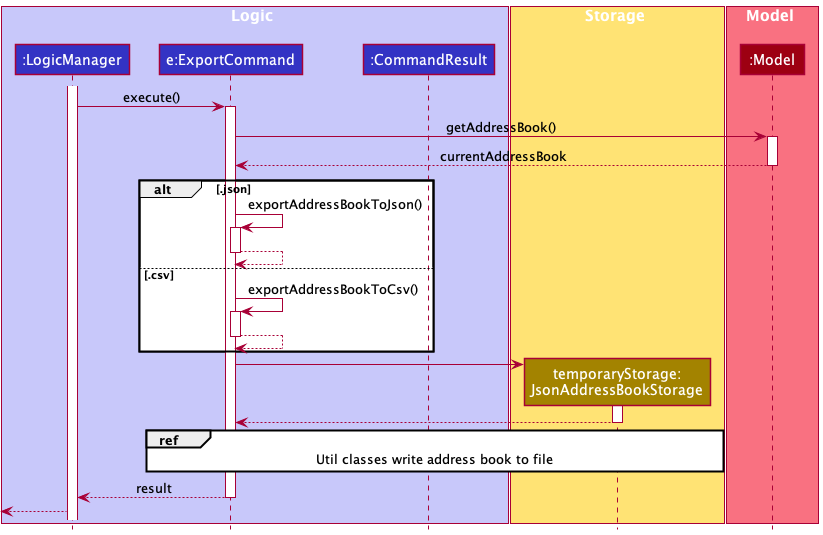
Next, The ExportCommand is then executed in LogicManager. The ExportCommand class extends Command. It stores the filename as a class variable and its implementation of Command#execute(). Here, the filename is checked again to verify that it is a .csv or .json file. The current address book is obtained by Model#getAddressBook(). Then, depending on the file type, one of the following methods are called:
-
exportAddressBookToJson(ReadOnlyAddressBook)A temporary instance of
JsonAddressBookStorageis created by passing in the filename, andsaveAddressBook(ReadOnlyAddressBook)saves the current address book to the specified file.temporaryStorage.saveAddressBook(currentAddressBook, filePath, true); Note: The third argument
 trueindicates thatsaveAddressBook(ReadOnlyAddressBook)is triggered by an export command. This distinction is necessary as default saving of contact data to the address book is performed with the same method, but requires overwriting of the storage file, whereas the export command does not overwrite files.In the Storage component, utility classes are used to check, create and write to the JSON file.
-
FileUtil#isFileExists(Path)checks if there exists a file with the specified name. If there is, aFileAlreadyExistsExceptionis thrown. -
FileUtil#createIfMissing(Path)creates the JSON file. - The current
ReadOnlyAddressBookis used to instantiate a newJsonSerializableAddressBook, a JSON-friendly equivalent ofReadOnlyAddressBookcontaining Jackson annotations. It stores a list ofJsonAdaptedPersoninstead ofPerson, which is also JSON-friendly. -
JsonUtil#saveJsonFile(T, Path)serializes the address book and writes to the file, usingObjectMapper, a Jackson class.
-
-
exportAddressBookToCsv(ReadOnlyAddressBook)A temporary instance of
CsvAddressBookStorageis created by passing in the filename, andsaveAddressBook(ReadOnlyAddressBook)saves the current address book to the specified file.temporaryStorage.saveAddressBook(currentAddressBook, filePath);In the Storage component, utility classes are used to check, create and write to the JSON file.
-
FileUtil#isFileExists(Path)checks if there exists a file with the specified name. If there is, aFileAlreadyExistsExceptionis thrown. -
FileUtil#createIfMissing(Path)creates the CSV file. - The current
ReadOnlyAddressBookis used to instantiate a newCsvSerializableAddressBook, a CSV-friendly equivalent ofReadOnlyAddressBookcontaining Jackson annotations. It stores a list ofCsvAdaptedPersoninstead ofPerson, which is also CSV-friendly. -
CsvUtil#saveCsvFile(T, Path)serializes the address book and writes to the file, usingCsvMapper, a Jackson class.
-
The Sequence Diagram below illustrates the interactions during the second step of executing execute("export cs2103t.json").
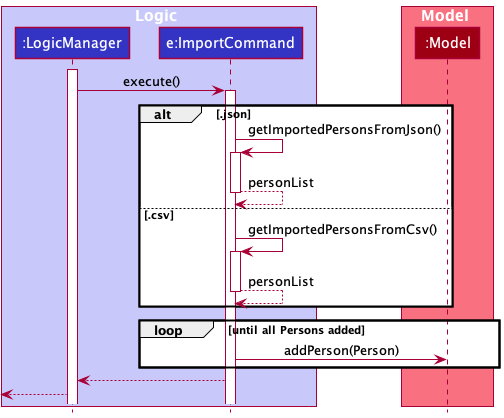
Import command
The Import command imports contacts from a JSON or CSV file and adds them to the current contact list, with help from Jackson, an external library. Import does not remove existing contacts, and ignores duplicate contacts.
Executing an Import command can be summarized with the following steps:
- Similar to Export, the first step is parsing the user command, which is done in
ImportCommandParser. After verification, anImportCommandis generated. - Upon executing the
ImportCommand, one of the 2 methods are called to obtain aList<Person>from the specified file.ImportCommand#getImportedPersonsFromJson()ImportCommand#getImportedPersonsFromCsv()
- By iterating through the list, each person is added to the current contact list in
Model, skipping duplicates. - Command Result with success message is returned.
The sequence diagram for the first step is similar to the Export Command. The following sequence diagram illustrates the execution of an import command from part 2 onwards.
Reading JSON / CSV file
In both scenarios, a new JsonAddressBookStorage or CsvAddressBookStorage is created. The AddressBookStorage method readAddressBook() then reads the respective file using JsonUtil#readJsonFile() or CsvUtil#readCsvFile(). In both cases, the files are read using Jackson’s ObjectMapper or CsvMapper classes respectively.
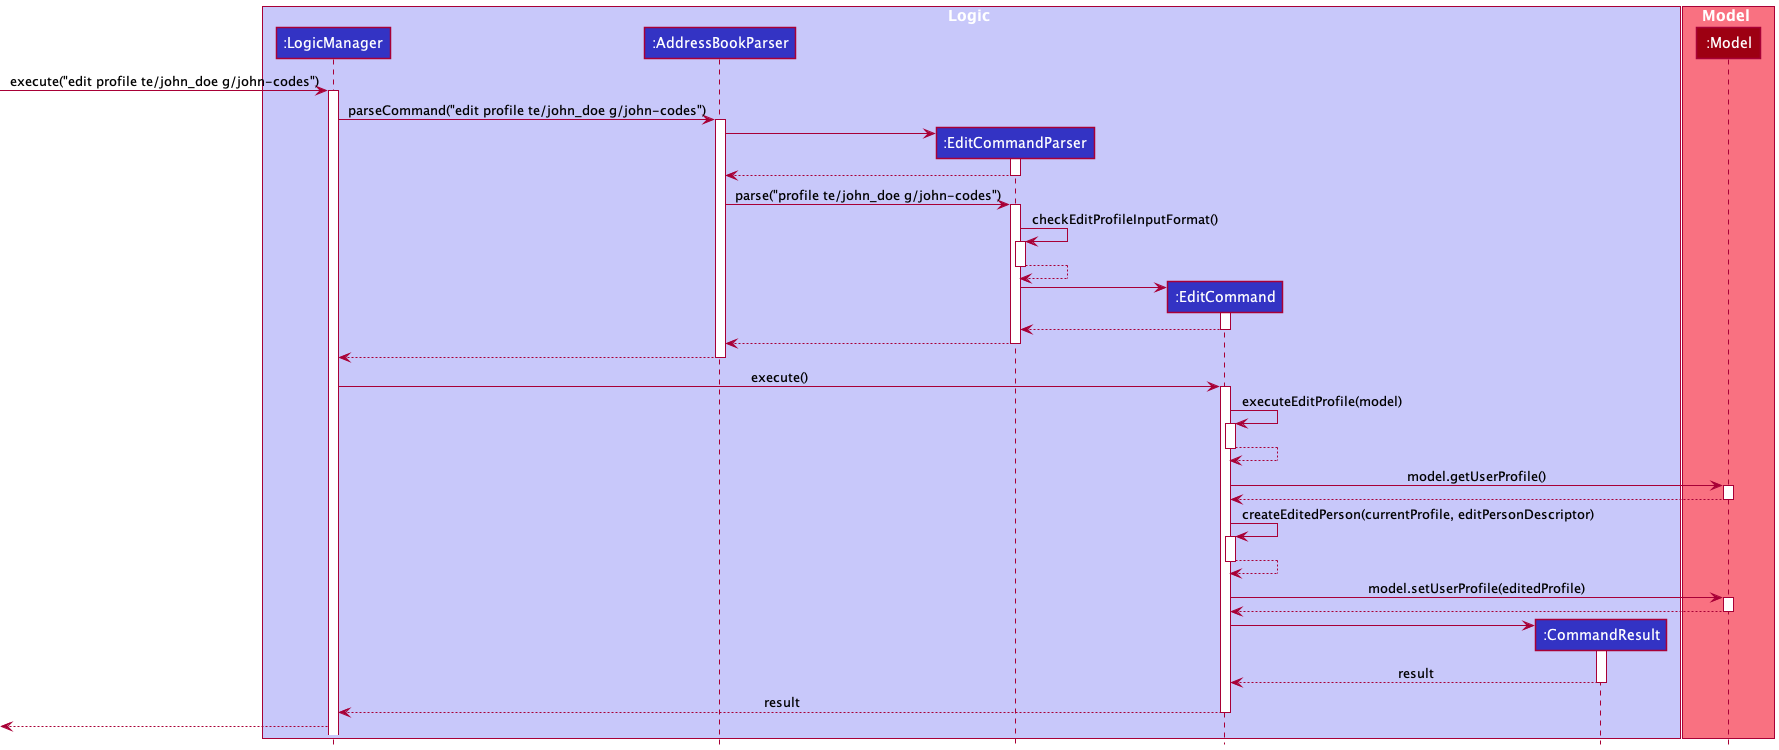
Edit Profile command
Implementation
Edits the user’s profile linked to the Address Book.
The user’s profile contains details such as their name, Telegram Handle and GitHub username, which need to be kept up to date. This is especially important as the user’s GitHub username is crucial for the Find a Buddy feature which matches them with a potential teammate using the GitHub metadata.
The edit profile feature allows edit to change their name, Telegram handle and GitHub username.
The implementation for editing the user profile is similar to that of editing a student contact.
It is facilitated by the EditCommandParser class, which implements Parser<EditCommand>.
It implements the parse() method, which determines whether what’s being edited is a contact or the user profile, checks for
the validity of user input (through the checkEditProfileInputFormat() method) and returns an EditCommand, to be executed in
LogicManager.
The EditCommand class extends Command. Its instance is created by providing an index (since a contact isn’t being edited here,
the index passed is 1 by default and will not affect the process), and an editPersonDescriptor (which represents the updated user profile).
Its implementation of Command#execute() calls the executeEditProfile() method which edits the user profile as necessary.
The Sequence Diagram below illustrates the interactions within the Logic and Model components for
the execute("edit profile te/john_doe g/john-codes") API call.
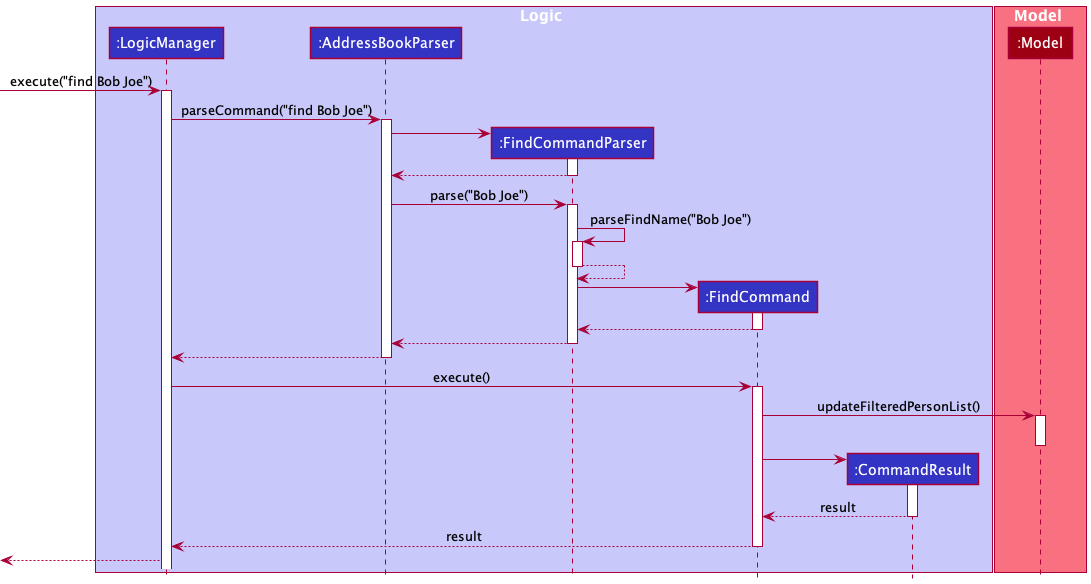
Find command
Implementation
The Find command accepts names, tags, Telegram handles or GitHub usernames as parameters with the following prefixes :
- no prefix : for names
-
t/: for tags -
te/: for Telegram handles -
g/: for GitHub usernames
and allows users to search for contacts based on the specified criterion.
It is facilitated by the FindCommandParser class, which implements Parser<FindCommand>.
It implements the parse() method, which parses the find parameter (eg: name, tag, etc.) and returns a FindCommand, to be executed in
LogicManager.
The FindCommand class extends Command. Its instance is created by providing a predicate (condition to be fulfilled by the elements of
the FilteredPersonList that contains the contact(s) matching the find parameters). Its implementation of
Command#execute() updates the FilteredPersonList to reflect the search performed on the contacts in the address book.
The Sequence Diagram below illustrates the interactions within the Logic and Model components for
the execute("find Bob Joe") API call.
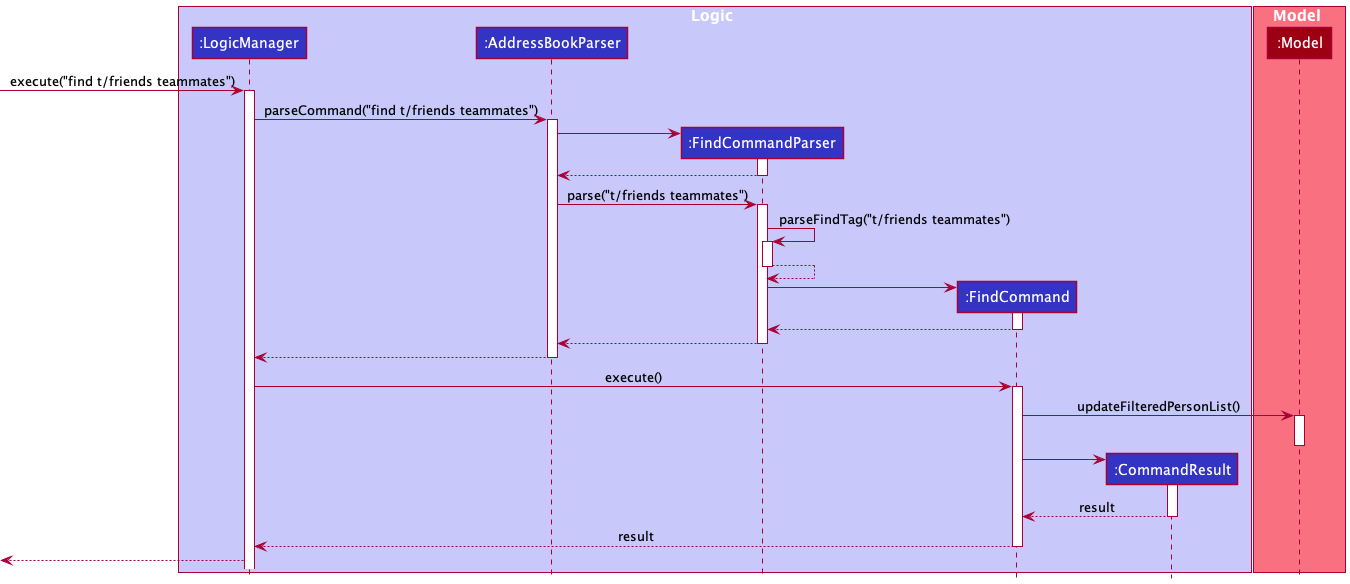
The Sequence Diagram below illustrates the interactions within the Logic and Model components for
the execute("find t/friends teammates") API call.
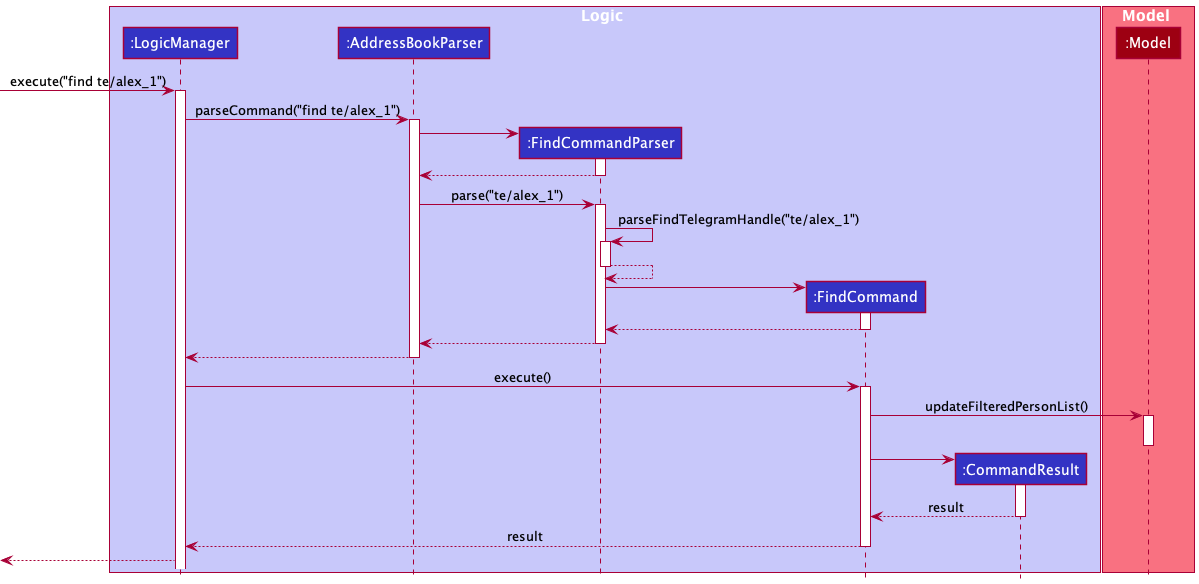
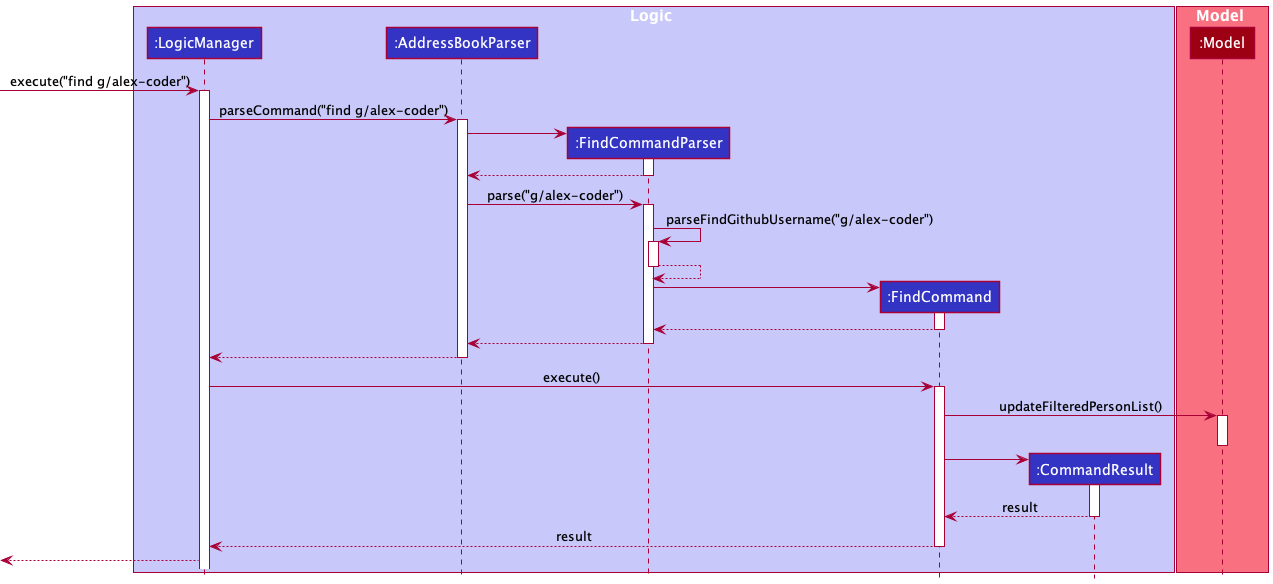
The Sequence Diagram below illustrates the interactions within the Logic and Model components for
the execute("find te/alex_1") API call.
The Sequence Diagram below illustrates the interactions within the Logic and Model components for
the execute("find g/alex-coder") API call.
Tag command
Implementation
The Tag command allows users to directly add or remove tags from a specific contact. This command was introduced to overcome the following limitations:
- Editing a contact’s tag field using
edit <INDEX> t/<TAG>will replace the existing tag with the specified one instead of adding on to it. - No way to remove tags from a contact directly.
It is facilitated by the TagCommandParser class, which implements Parser<TagCommand>.
It implements the parse() method, which parses the index of the contact to which tags are to be added or from which
tags are to be removed. Moreover, checking the validity of the user input (i.e. ensuring the presence of arguments for the Tag command like tags to add where the prefix a/ is present and the
presence of tags to remove where the prefix r/ is present) is handled by the checkInputFormat method. Once the input is confirmed to be valid, parse() returns a TagCommand, to be executed in
LogicManager.
The TagCommand class extends Command. Its instance is created by providing the targetIndex of the contact to which
tags are to be added or from which tags are to be removed (of type Index), an ArrayList containing the tags to be
added (toAdd) and an ArrayList containing the tags to be removed (toRemove). Its implementation of Command#execute() is where the updation of the FilteredPersonList to reflect the search performed on the contacts in the address book.
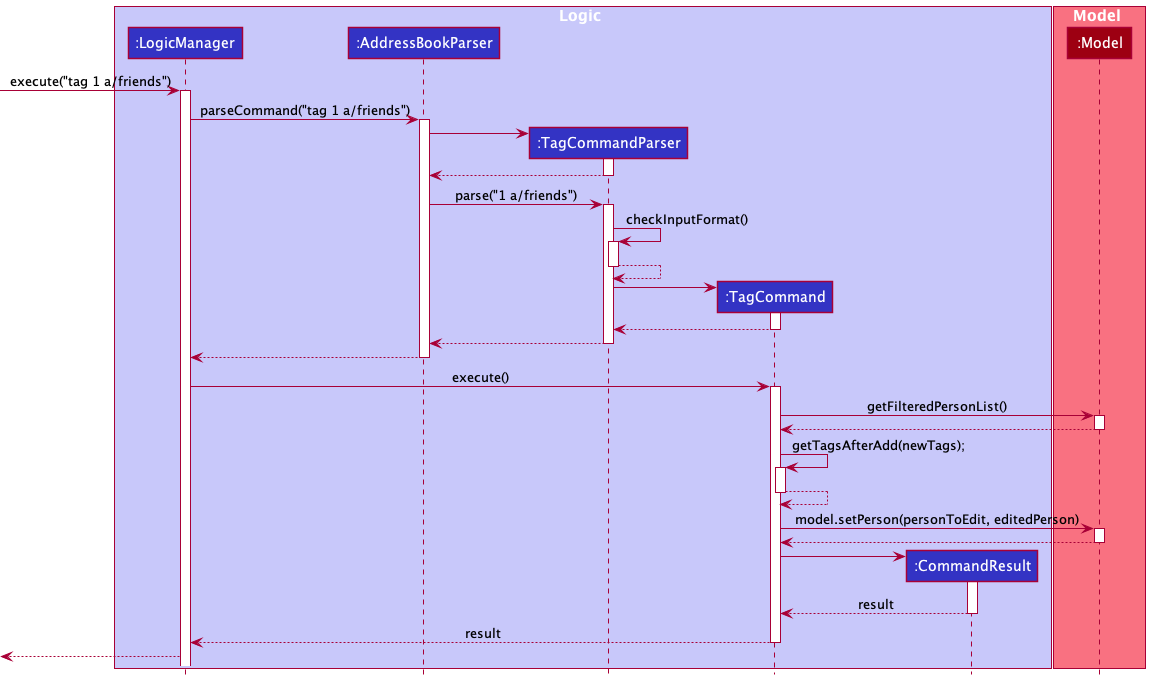
The Sequence Diagram below illustrates the interactions within the Logic and Model components for
the execute("tag 1 a/friends") API call.
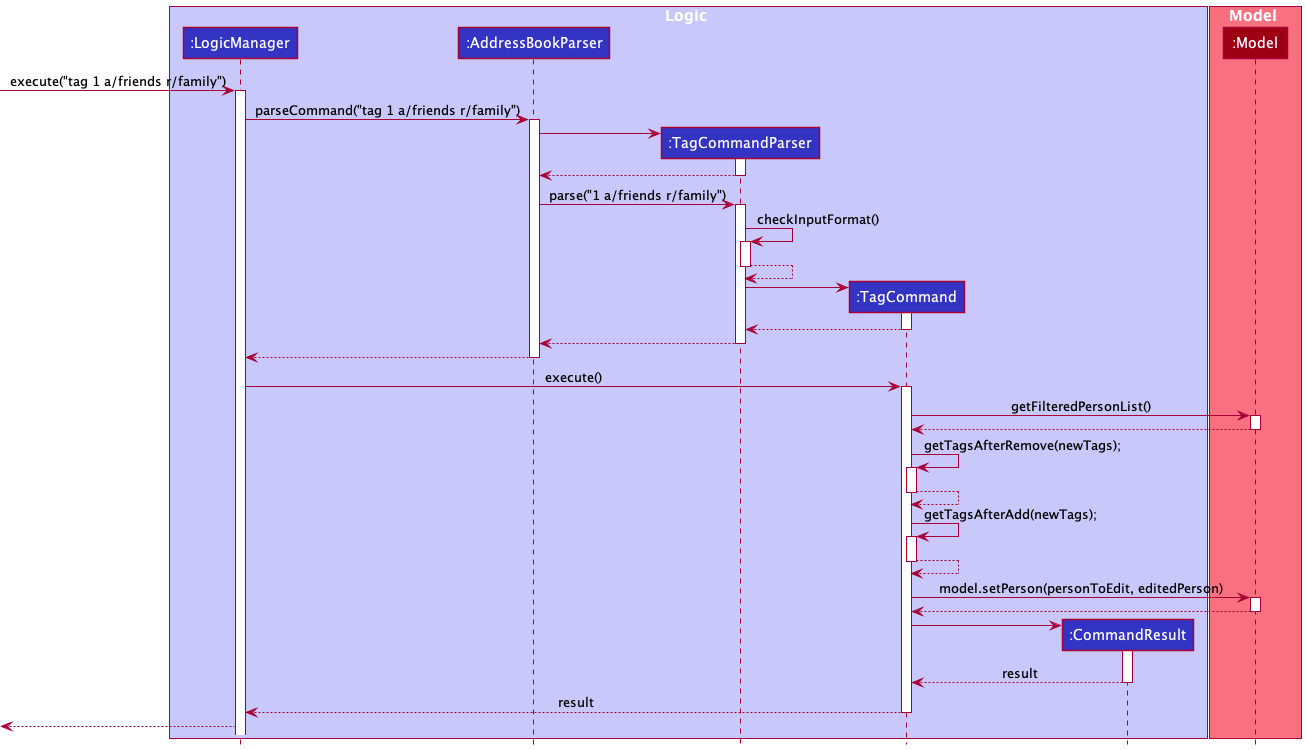
The Sequence Diagram below illustrates the interactions within the Logic and Model components for
the execute("tag 1 a/friends r/family") API call.
Welcome Window
Implementation
The class WelcomeWindow is responsible for displaying the welcome window at
the start when the application is launched. It is facilitated by the
WelcomeWindow.fxml and WelcomeWindow.css. The .fxml file is responsible
for the layout of the various components in this window, and the .css file
adds a style and enhances the overall UI.
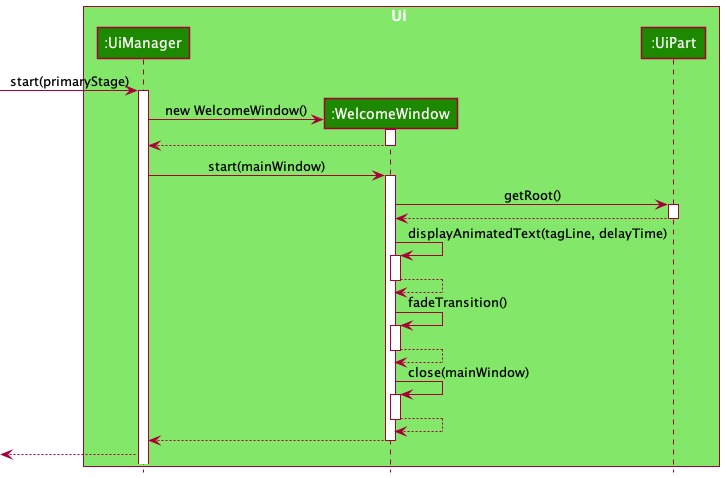
The WelcomeWindow class extends UiPart<Stage>.
When the app is launched, an instance of this class is created, and the
WelcomeWindow#start() is invoked to display the window. Various methods, including
fadeTransition() and displayAnimatedText(String textToDisplay, double delayTime)
, are used within this class to achieve the fading image and character typing
effect, respectively.
Profile SetUp Window
Implementation
The class ProfileSetUpWindow is responsible for displaying the Profile SetUp Window.
It is only shown once when the User launches the app for the first time, and their
credentials are not present. They have to input their valid credentials here.
It is facilitated by ProfileSetUpWindow.fxml and
ProfileSetUpWindow.css. The .fxml file is responsible for the layout of the
various components in this window, and the .css file adds a style and enhances
the overall UI.
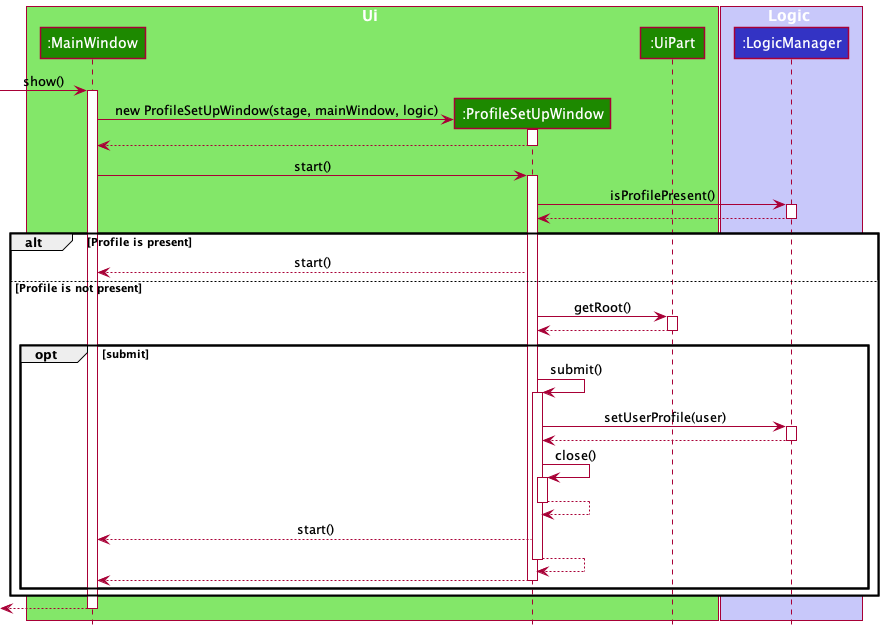
The ProfileSetUpWindow class extends UiPart<Stage>.
This window would only be visible after the Welcome Window Splash Screen.
WelcomeWindow hands over the control to MainWindow after execution, which
then sets up the ProfileSetUpWindow. On Initializing and calling start()
method of the ProfileSetUpWindow, the ProfileSetUpWindow with the help of
a Logic object (which is obtained during initialization) checks, if a
User Profile is present. If it is present, it
again hands over the control to the MainWindow by calling the start() method
of the MainWindow. Else, It displays the Profile SetUp Window and
waits for a response from the User.
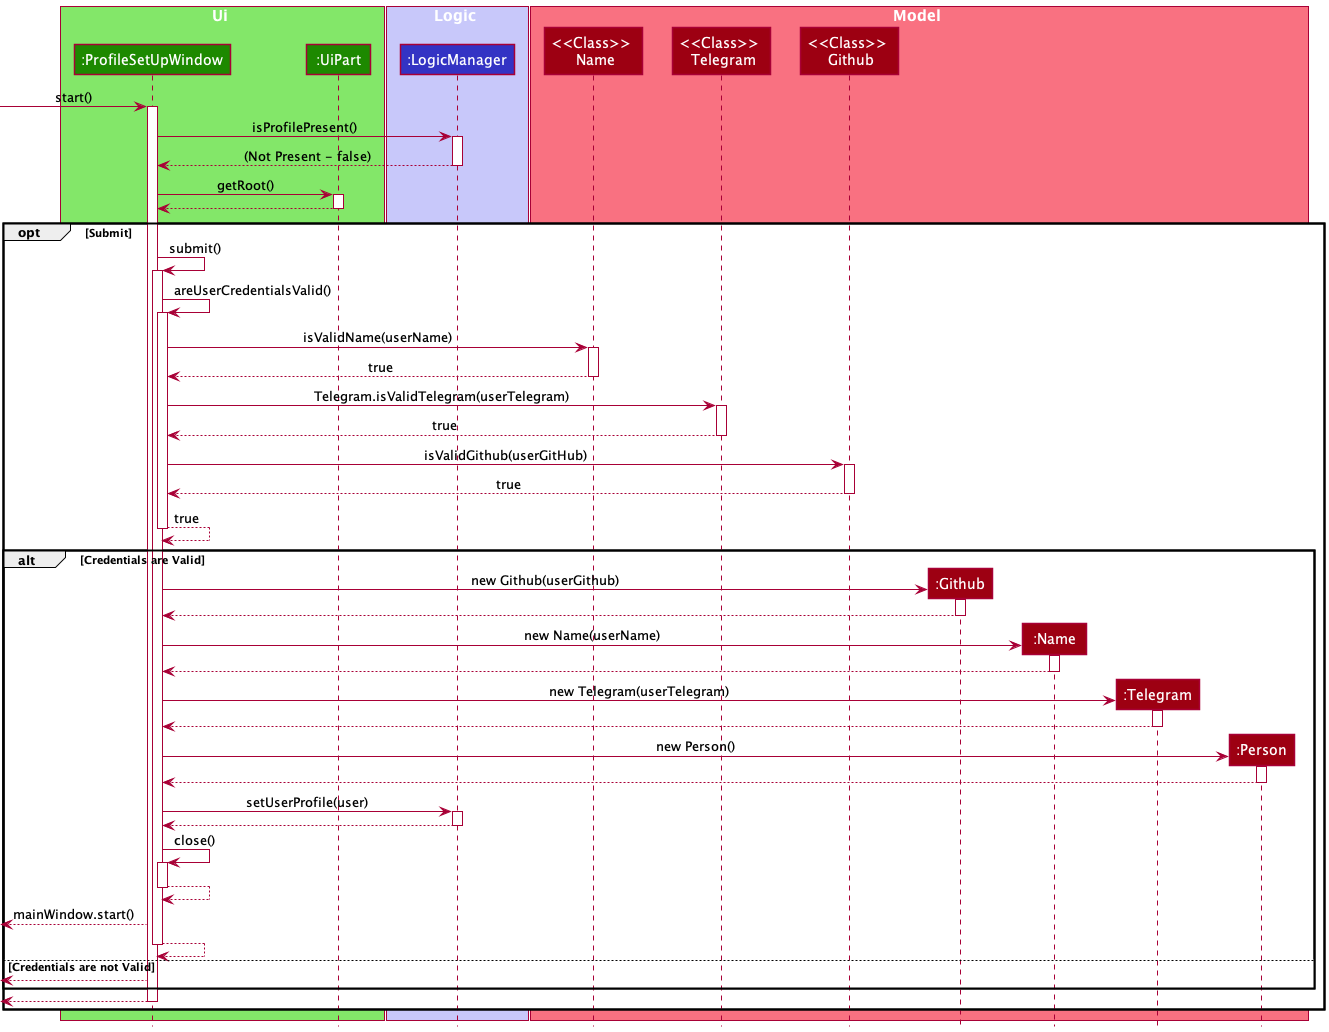
After the User has input their credentials in the text fields, they are expected to
click the Submit button. When that button is clicked upon, the submit() method is
invoked. This method calls the areUserCredentialsValid() method to verify if the
entered credentials are valid or not. If they are valid, the User Profile is deemed
complete and is set up with the help of the Logic object obtained during
the initialization. If the credentials are not valid, an error message
is shown in the Window, highlighting which credential is invalid. The User cannot proceed
forward without entering all valid Credentials.
The areUserCredentialsValid() class checks if the entered Name, Telegram Handle,
and the GitHub Username are valid.
- Class level method
isValidName(), ofNameclass verifies the Name entered. - Class level method
isValidTelegram(), ofTelegramclass verifies the Telegram Handle entered. - Class level method
isValidGithub(), ofGithubclass verifies the GitHub Username entered.
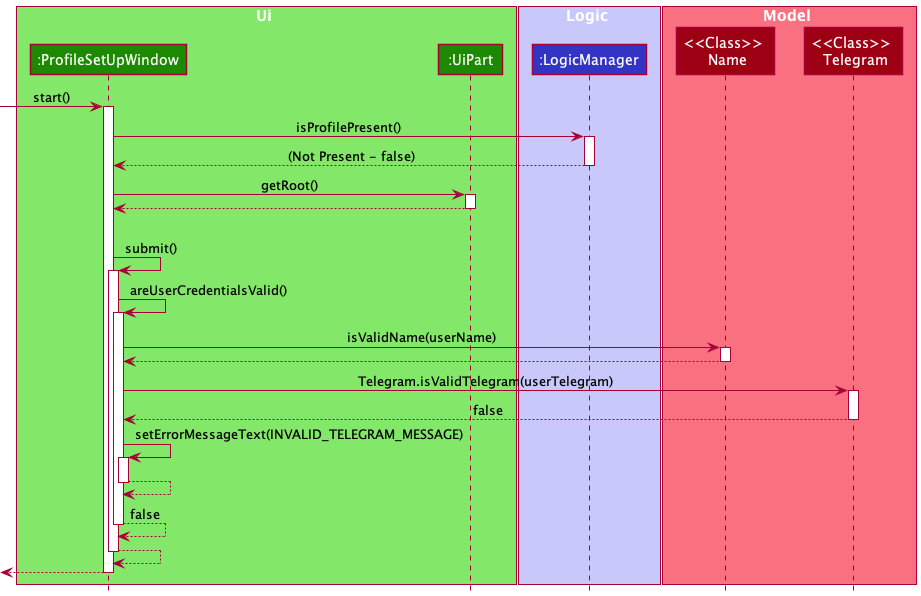
If either of the credentials is not valid, the setErrorMessageText(MESSAGE) is
called with the appropriate error message. This method is responsible for displaying
this error message in the Window.
A Typical Scenario Would be like:
If The User Enters an Invalid Telegram Credential:
The Big Picture (High Level Diagram):
User Profile Window
Implementation
The class UserProfileWindow is responsible for displaying the User Profile
Window. It is shown when the user either uses the keyboard shortcut,
Command/Control + P, or clicks on the User Profile located in the top right in
the Menu Bar. It is facilitated by UserProfileWindow.fxml
and UserProfileWindow.css. The .fxml file is responsible for the layout of the
various components in this window, and the .css file adds a style and enhances the
overall UI.
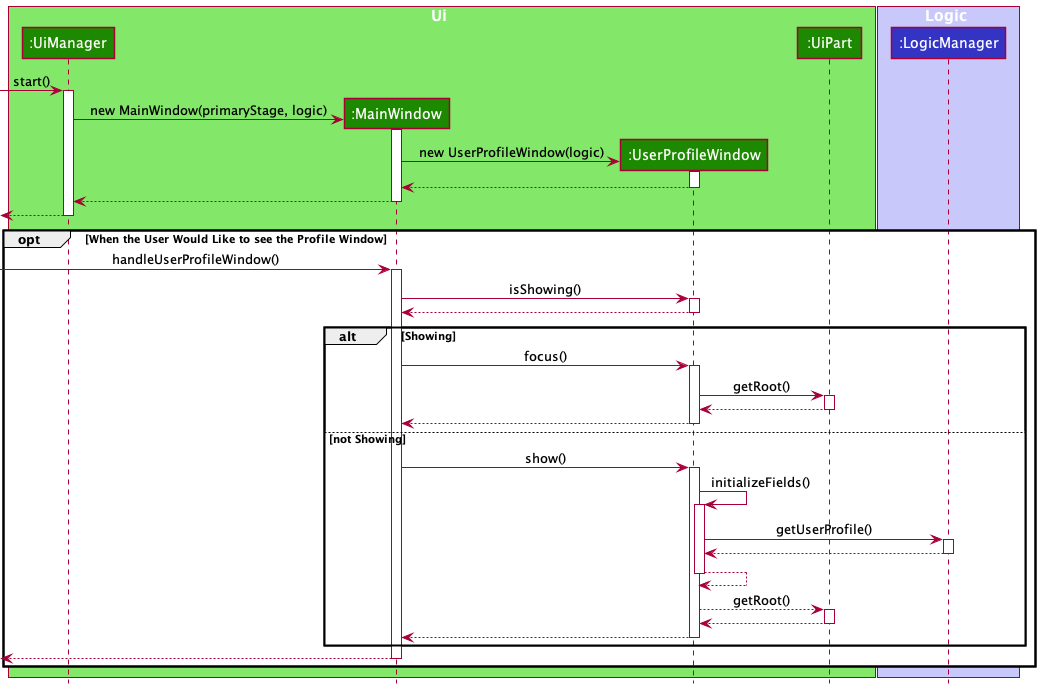
The UserProfileWindow class extends UiPart<Stage>.
This window can only be viewed when the app has successfully started up and has valid User Credentials.
This window is initialized when the MainWindow is initialized. It is
initialized in the MainWindow constructor. This window, to be seen, has to be
triggered as an event by the user. The MainWindow class has a method
handleUserProfileWindow(), which is responsible for displaying this window.
The handleUserProfileWindow() when called, calls the method isShowing() via
the object initialized earlier. If it is not showing, the show() method of the
UserProfileWindow class is called upon. Else, if it is already showing, the
focus() method is called upon. Along with that, in case the window had been
minimized by the User, UserProfileWindow#getRoot()#toFront() is called to
bring the window to the maximized state.
The UserProfileWindow#show(), first calls the UserProfileWindow#initializeFields(),
to initialize all the fields with the latest User Profile Credentials. This would, in turn
also call UserProfileWindow#setFields(), to set them up in the UI. After all the setting
up is done, the User Profile Window is shown.
The UserProfileWindow#focus(), calls the getRoot() method and on that requestFocus()
is called upon to request focus.
Help Window
Implementation
The class HelpWindow is responsible for displaying the Help
Window. It is shown when the user either uses the keyboard shortcut,
F1, or clicks on Help located on the top left in the Menu Bar, or types
in help in the command box. It is facilitated by HelpWindow.fxml
and HelpWindow.css. The .fxml file is responsible for the layout of the
various components in this window, and the .css file adds a style and enhances the
overall UI.
The HelpWindow class extends UiPart<Stage>.
This window can only be viewed when the app has successfully started up and has valid User Credentials.
This window is initialized when the MainWindow is initialized. It is
initialized in the MainWindow constructor. This window, to be seen, has to be
triggered as an event by the user. The MainWindow class has a method
handleHelpWindow(), which is responsible for displaying this window.
On initializing the HelpWindow class, HelpWindow#setUpCommandDetails() and
HelpWindow#setUpHelpTableView() are called.
setUpCommandDetails() creates multiple objects of CommandDetails, all of them
representing a unique command that the app supports. Those are then added to an
ObservableList<CommandDetails>, which is linked to the TableView in the UI.
setUpHelpTableView() sets and places various restrictions on the table.
It restricts any events or scrolling on the table. Also, It adjusts the height
of the table according to the number of CommandDetails present in it.
The handleHelpWindow() when called, calls the method isShowing() via
the object initialized earlier. If it is not showing, the show() method of the
HelpWindow class is called upon. Else, if it is already showing, the
focus() method is called upon. Along with that, in case the window had been
minimized by the User, HelpWindow#getRoot()#toFront() is called to
bring the window to the maximized state.
There is also a button present in the window, Visit URL, which upon
clicking, takes the User to the UserGuide. It opens the UserGuide in the
Users systems default browser.


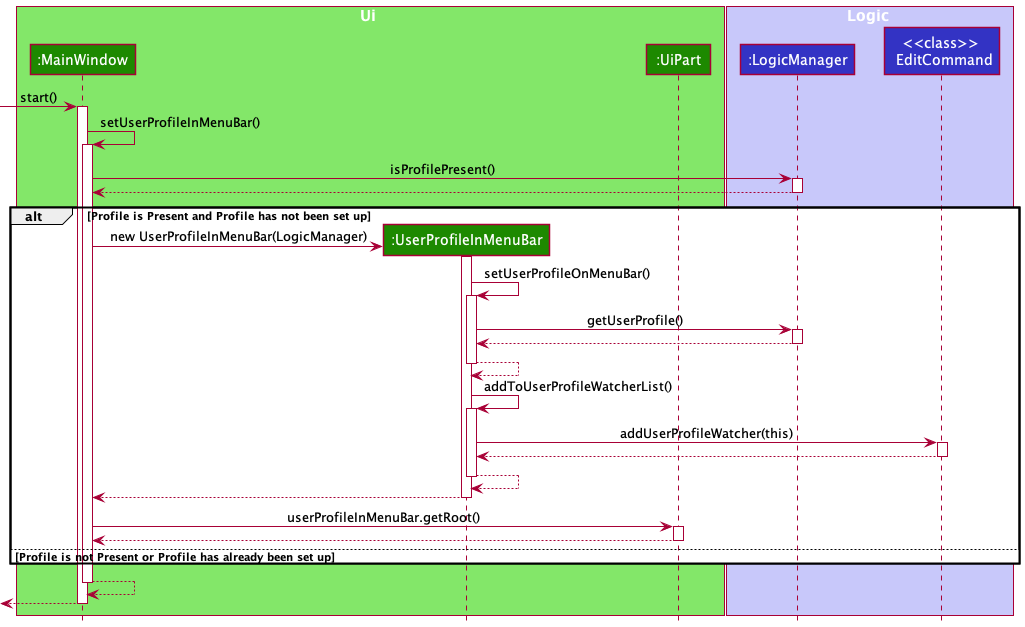
User Profile in Menu Bar
Implementation
The class UserProfileInMenuBar is responsible for displaying the User
Profile in the Menu Bar. It is shown in the Main Window, in the top right
of the Menu Bar beside the Bell icon. It is facilitated by UserProfileInMenuBar.fxml.
The .fxml file is responsible for the layout of the various components inside
this Region. On clicking this, the UserProfileWindow is shown.

The UserProfileInMenuBar class extends UiPart<Region> and implements
UserProfileWatcher.
This Region can only be viewed when the app has successfully started up and has valid User Credentials.
This Region is initialized when the MainWindow#start() is called. On
initializing the UserProfileInMenuBar class, UserProfileInMenuBar#setUserProfileOnMenuBar()
and UserProfileInMenuBar#addToUserProfileWatcherList() are called.
setUserProfileOnMenuBar() is responsible for retrieving the User Credentials with
the help of the Logic object obtained during initialization and setting up the
ImageView and Label with the User Credentials retrieved.
addToUserProfileWatcherList() is responsible for adding this (UserProfileWatcher)
to a watchers list, such that, in the scenario, the User updates their profile
credentials, the changes are reflected immediately. As the User is able to
edit their Credentials via the EditCommand, the profile watchers list is present there.
A static method in EditCommand, addUserProfileWatcher(this) is called upon, by
passing this (UserProfileWatcher) as an argument, to add it to the profile watchers list.
Whenever there is a change in the User Credentials, the updateUserProfile() is
called upon in the UserProfileInMenuBar, which in turn calls the
setUserProfileOnMenuBar(). This method then retrieves the new User Credentials
and sets them up.
Show command
Implementation
The Show command accepts the index in list or name of a contact as a parameter, and shows all the details of the contact to the
Person Details Pane on the right-hand side of the screen. It is facilitated by the ShowCommandParser class, which implements Parser<ShowCommand>.
It implements the parse() method, which parses the index/name and returns a ShowCommand, to be executed in
LogicManager.
The ShowCommand class extends Command. It stores the index/name as a class variable and its implementation of
Command#execute() calls Command#executeWithIndex() or Command#executeWithName() based on whether parameter is index or name.
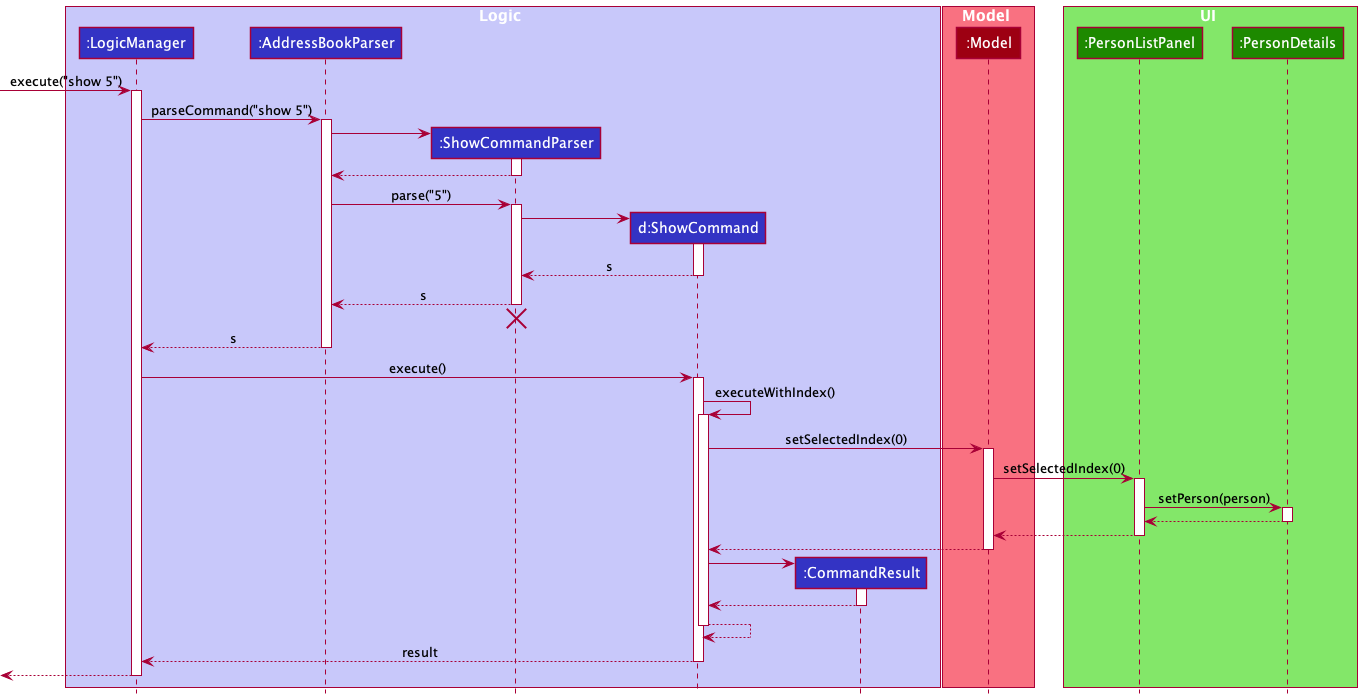
Implementation of Command#executeWithIndex()
This is called if the parameter is a parsable Integer.
The method calls model.setSelectedIndex(index) which displays the details of the contact on the Details Pane.
The Sequence Diagram below illustrates the interactions within the Logic, Model and UI components for
the execute("show 5") API call.
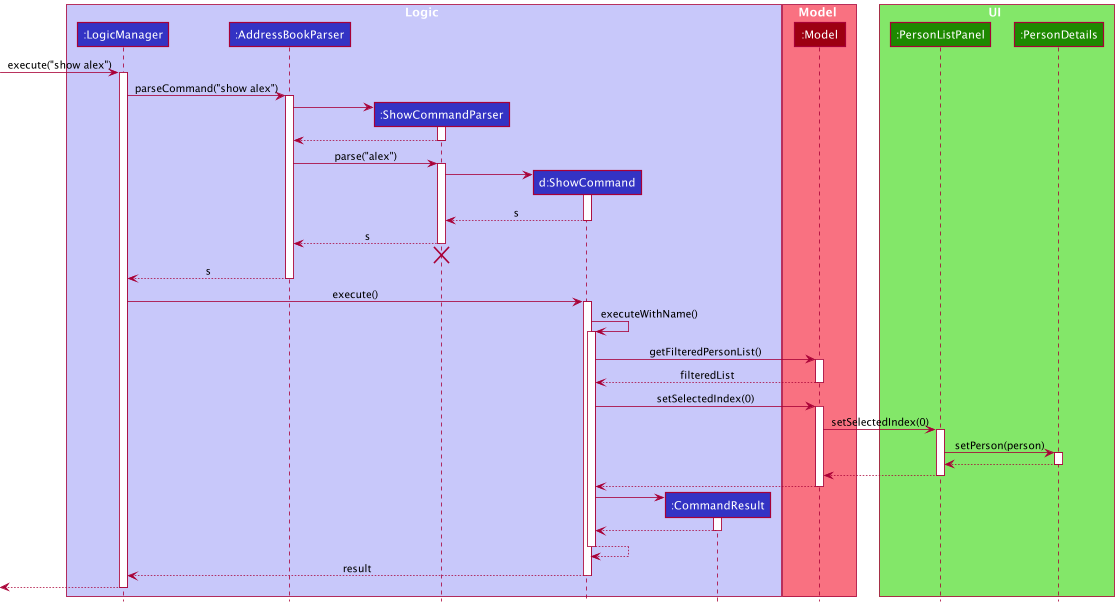
Implementation of Command#executeWithName()
This is called if the parameter is NOT a parsable Integer.
The method calls model.setSelectedIndex(index) with index gotten from the filteredList which displays the details of the contact on the Details Pane.
If there are multiple contacts with names that contain the parameter keyword then a list of such persons are shown.
If there is no contact with name that contain the parameter keyword in the filteredList, then the entire address book is searched.
The Sequence Diagram below illustrates the interactions within the Logic, Model and UI components for
the execute("show alex") API call.
Command History (Keyboard Shortcut)
In the Command Box, users can use up and down arrow keys to navigate through previous commands, similar to the Command Line. This is achieved by interactions between CommandHistory and CommandBox.
The CommandHistory class contains these key variables and methods:
- An
ArrayList<String>which stores previous user commands - An
intwhich indicates the current index - Methods
add(String),getPrevious(),getNext(),resetIndex()
When CohortConnect UI is initialized, the CommandBox class representing the Command Box is created, containing a single instance of CommandHistory. It interacts with CommandHistory in 3 ways:
-
If
KeyCode.UPis detected in theTextField,CommandHistory#getPrevious()is called, and the returned String is set to the text field. Note: If the history is empty, UP will return an empty string. If the current index is at the earliest command, it will continue to return the same command.
The activity diagram below illustrates what happens when a user presses the UP arrow key.

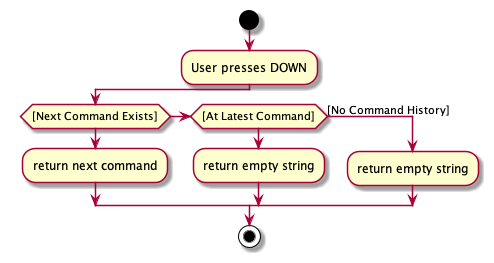
-
If
KeyCode.DOWNis detected in theTextField,CommandHistory#getNext()is called, and the returned String is set to the text field. Note: If the history is empty or the current index is at the latest command, DOWN will return an empty string.
The activity diagram below illustrates what happens when a user presses the DOWN arrow key.
-
When the user presses enter to execute a command, the command is saved using
CommandHistory#add(String), and the current index is reset usingCommandHistory#resetIndex().
Switching Between Tabs (Keyboard Shortcut)
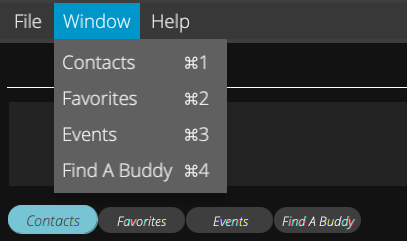
Accelerators are shortcuts to Menu Items, which can be associated with KeyCombinations. To switch between the 4 tabs, a new Menu Window was added in the MenuBar, containing 4 Menu Items which can be accessed using Cmd/Ctrl + 1/2/3/4. Each of the Menu Items have an onAction method declared in their FXML files, and defined in MainWindow.java.
-
Accelerators for the 4 Menu Items are set during initialization of
MainWindow.java.private void setAccelerators() { setAccelerator(contacts, KeyCombination.valueOf("Shortcut+1")); setAccelerator(favorites, KeyCombination.valueOf("Shortcut+2")); setAccelerator(events, KeyCombination.valueOf("Shortcut+3")); setAccelerator(findABuddy, KeyCombination.valueOf("Shortcut+4")); ... } Note: When detecting KeyCombination, Javafx automatically switches its interpretation of “Shortcut” as “Ctrl” for Windows and “Cmd” for macOS. The symbols in the MenuItem (shown above) change as well.
-
When their respective key combinations are detected, the MenuItem’s onAction methods are called. For example, the following method is called when Cmd/Ctrl + 4 is detected.
@FXML public void handleFindABuddy() { tabPaneHeader.activateFindABuddy(logic); } -
TabPaneHeaderthen switches to the Find A Buddy tab usingtabPane.getSelectionModel().select(3).
GitHub and Telegram Commands
In the Command Box, users can enter g or te to open the currently selected user’s GitHub or Telegram in a browser, using their respective username.
The following links are used
- GitHub:
https://github.com/{username} - Telegram:
https://t.me/{username}
Similar to other commands, the commands g and te are parsed in AddressBookParser, where it is checked that there are no other arguments.
During their execution, it is checked that there is a current user selected, using Model#getSelectedIndex(). If the returned value is -1, then a CommandException is thrown.
The CommandResult returned indicates whether it is triggered by a GitHub or Telegram command using booleans variables.
In MainWindow, if the command result isGithub() or isTelegram(), the GitHub and Telegram links in PersonDetails will be triggered using PersonDetails#openTelegram() and PersonDetails#openGithub().
Find A Buddy Feature

By switching to the Find A Buddy tab, the user can retrieve the top 5 matches to the user based on the GitHub data gathered.
Implementation
For the feature, the data gathered includes
- Number of Repositories
- Percentage of Contributions by Language
A similarity score is calculated based on the following three metrics:
- Euclidean Distance
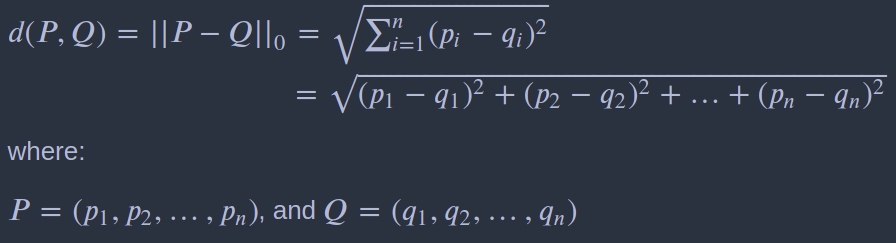
- Manhattan Distance
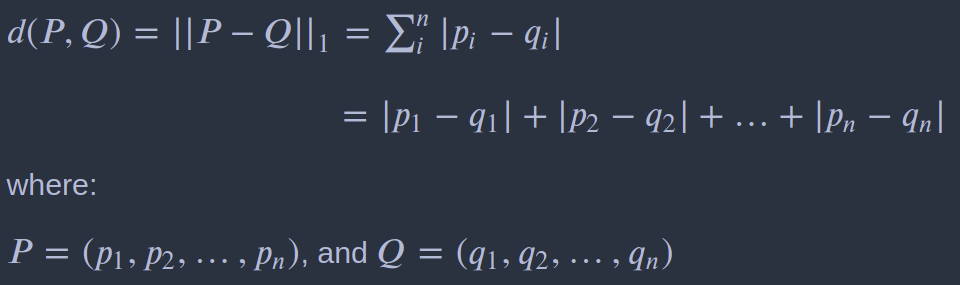
- Cosine Distance

The similarity is calculated using the following formula:
Similarity Score = 1 - Normalize((Euclidean Distance + Manhattan Distance + Cosine Distance) / 3.0)
Documentation, logging, testing, configuration, dev-ops
Appendix: Requirements
Product scope
Target user profile:
- Computer Science students
- needs to manage a significant number of contacts
- needs help finding teammates
- prefer desktop apps over other types
- can type fast
- prefers typing to mouse interactions
- is reasonably comfortable using CLI apps
Value proposition: Facilitates networking among Computer Science students.
User stories
Priorities: High (must have) - * * *, Medium (nice to have) - * *, Low (unlikely to have) - *
| Priority | As a … | I want to … | So that I can… |
|---|---|---|---|
* * * |
user | delete contacts | make sure that the address book remains relevant and up to date |
* * * |
user | edit individual contacts | update any of the fields when necessary |
* * * |
user | add individual contacts | reach out to them later |
* * |
user | search for contact(s) by tag(s) | contact them based on their grouping |
* * |
user | search for contact(s) by Telegram handles(s) | contact them conveniently |
* * |
user | search for contact(s) by GitHub username(s) | contact them conveniently |
* * * |
professor | be able to export a set of contacts | let other professors, TAs and students get a set of contacts quickly |
* * * |
new user | be able to import a set of contacts | have some to begin with |
* * * |
new user | have an introduction splash screen | utilise the app and its feature well |
* * * |
CLI user | avoid using my mouse as much as possible | - |
* * * |
user | group/tag people into teammates, classmates, TA’s and Profs | easily manage my contacts |
* * * |
user | connect with seniors who have taken the same module | have more guidance |
* * * |
Teaching assistant | be able to get in touch with the students in my class through Telegram handles | - |
* * * |
new user | know all the different commands | fully utilise the tools available |
* * * |
new user | learn the command formats | perform tasks quickly and efficiently |
* * * |
user | be able to store my contact omitting certain fields | save contact without having to include email or address |
* * |
user | have a clean and uncluttered GUI | navigate easily between different functions in the application |
* |
user | retrieve previous and next commands with up and down arrow key | browse my command history to retype misspelled commands |
* * * |
user | sync my data with GitHub account | identify my colleagues by their profiles and connect with other users |
* * * |
user | view the profiles of my contacts | learn more about them and connect with them |
* * * |
user | navigate to a contact’s Telegram or GitHub in a single click | easily contact and interact with them |
* * * |
professor | import and export contacts using CSV files | easily create list of contacts using Excel, for my students to import |
* * * |
user | favorite and unfavorite my contacts | easily identify important people |
* * * |
user | enter my details | make use of the Find A Buddy feature |
* * * |
user | find a buddy | work with them for group projects or as a study buddy |
* * |
user | switch between tabs using keyboard shortcuts | navigate between tabs quickly |
* * |
user | edit my profile | modify my details is they are misspelled during set up |
* * |
user | see my profile | verify that my details are correct |
* * * |
user | open a contact’s Github or Telegram with a single command | easily browse their Github page or reach them on Telegram |
Use cases
(For all use cases below, the System is the CohortConnect and the Actor is the user, unless specified otherwise)
Use Case 1: Setting Up User Profile
MSS
- User enters their Name.
- User enters their Telegram Handle.
- User enters their GitHub Username.
- User clicks on the submit button.
-
CohortConnect shows the Main Window, signifying that the User Profile was set up.
Use case ends.
Extensions
- 4a. CohortConnect detects an error in the entered Name (Invalid Name).
- 4a1. CohortConnect shows an error message.
- 4a2. CohortConnect requests for a valid Name.
- 4a3. User enters new Name.
- 4a1-4a3 are repeated until the Name entered is valid.
- Use case resumes from step 5.
- 4b. CohortConnect detects an error in the entered Telegram Handle (Invalid Telegram Handle).
- 4b1. CohortConnect shows an error message.
- 4b2. CohortConnect requests for a valid Telegram Handle.
- 4b3. User enters new Telegram Handle.
- 4b1-4b3 are repeated until the Telegram Handle entered is valid.
- Use case resumes from step 5.
- 4c. CohortConnect detects an error in the entered GitHub Username (Invalid GitHub Username).
- 4c1. CohortConnect shows an error message.
- 4c2. CohortConnect requests for a valid GitHub Username.
- 4c3. User enters new GitHub Username.
- 4c1-4c3 are repeated until the GitHub Username entered is valid.
- Use case resumes from step 5.
- *a. At any time, the User chooses to close the app.
- *a1. CohortConnect closes.
Use case ends.
Use Case 2: Add user
MSS
- User enters command to add a contact.
- CohortConnect shows a successfully added message.
-
CohortConnect shows the updated list of contacts.
Use case ends.
Extensions
- 1a. The input command is invalid.
- 1a1. CohortConnect shows an error message.
- 1a2. CohortConnect requests for correct format.
- 1a3. User enters new data.
- 1a1-1a3 are repeated until the data entered are valid.
- Use case resumes from step 2.
- 1b. User enters an existing Telegram handle.
- 1b1. CohortConnect prompts that person already exists.
- 1b2. CohortConnect requests for correct format.
- 1b3. User enters new data.
- Steps 1b1-1b3 are repeated until the data entered are valid.
- Use case resumes from step 2.
- 1c. User enters an existing GitHub username.
- 1c1. CohortConnect prompts that person already exists.
- 1c2. CohortConnect requests for correct format.
- 1c3. User enters new data.
- Steps 1c1-1c3 are repeated until the data entered are valid.
- Use case resumes from step 2.
- 1d. The input command is missing compulsory fields.
- 1d1. CohortConnect shows an error message.
- 1d2. CohortConnect requests for compulsory fields.
- 1d3. User enters new data.
- 1d1-1d3 are repeated until the data entered are valid.
- Use case resumes from step 2.
Use Case 3: Edit user
MSS
- User enters command to edit a contact.
- CohortConnect shows a successfully edited message.
-
CohortConnect shows the updated list of contacts.
Use case ends.
Extensions
- 1a. The given index is not present.
- 1a1. CohortConnect shows an error message.
- 1a2. CohortConnect requests for correct format.
- 1a3. User enters new data.
- Steps 1a1-1a3 are repeated until the data entered are valid.
- Use case resumes from step 2.
- 1b. The given arguments are incorrectly formatted.
- 1b1. CohortConnect shows an error message.
- 1b2. CohortConnect requests for correct format.
- 1b3. User enters new data.
- Steps 1b1-1b3 are repeated until the data entered are valid.
- Use case resumes from step 2.
Use Case 4: Edit profile
MSS
- User enters command to edit profile.
- CohortConnect shows a successfully edited message.
-
CohortConnect updates user’s profile with the new details.
Use case ends.
Extensions
- 1a. The input command is invalid.
- 1a1. CohortConnect shows an error message.
- 1a2. CohortConnect requests for correct format.
- 1a3. User enters new data.
- 1a1-1a3 are repeated until the data entered are valid.
- Use case resumes from step 2.
Use Case 5: Add tags
MSS
- User enters command to add tags to a specific contact.
- CohortConnect shows a successfully added message.
-
CohortConnect updates tags of specific contact to contain new tags.
Use case ends.
Extensions
- 1a. The input command is invalid.
- 1a1. CohortConnect shows an error message.
- 1a2. CohortConnect requests for correct format.
- 1a3. User enters new data.
- 1a1-1a3 are repeated until the data entered are valid.
- Use case resumes from step 2.
- 1b. User tries to add existing tag.
- 1b1. CohortConnect prompts that the tag already exists.
- 1b2. CohortConnect requests for correct format.
- 1b3. User enters new data.
- Steps 1b1-1b3 are repeated until the data entered are valid.
- Use case resumes from step 2.
Use Case 6: Remove tags
MSS
- User enters command to remove tags from a specific contact.
- CohortConnect shows a successfully removed message.
-
CohortConnect updates tags of specific contact.
Use case ends.
Extensions
- 1a. The input command is invalid.
- 1a1. CohortConnect shows an error message.
- 1a2. CohortConnect requests for correct format.
- 1a3. User enters new data.
- 1a1-1a3 are repeated until the data entered are valid.
- Use case resumes from step 2.
- 1b. User tries to remove non-existent tag.
- 1b1. CohortConnect prompts that the tag to be removed does not exist.
- 1b2. CohortConnect requests for correct format.
- 1b3. User enters new data.
- Steps 1b1-1b3 are repeated until the data entered are valid.
- Use case resumes from step 2.
Use Case 7: Delete user
MSS
- User enters command to delete a contact.
- CohortConnect shows a successfully deleted message.
-
CohortConnect shows the updated list of contacts.
Use case ends.
Extensions
- 1a. The given index is not present.
- 1a1. CohortConnect shows an error message.
- 1a2. CohortConnect requests for correct format.
- 1a3. User enters new data.
- Steps 1a1-1a3 are repeated until the data entered are valid.
- Use case resumes from step 2.
- 1b. The given arguments are incorrectly formatted.
- 1b1. CohortConnect shows an error message.
- 1b2. CohortConnect requests for correct format.
- 1b3. User enters new data.
- Steps 1b1-1b3 are repeated until the data entered are valid.
- Use case resumes from step 2.
Use Case 8: Find a contact by name
MSS
- User enters command to find a contact by name.
-
CohortConnect shows list of contacts with matching name.
Use case ends.
Extensions
- 1a. The input command is invalid.
- 1a1. CohortConnect shows an error message.
- 1a2. CohortConnect requests for correct format.
- 1a3. User enters new data.
- 1a1-1a3 are repeated until the data entered are valid.
- Use case resumes from step 2.
- 1b. Contact with this name does not exist.
- 1b1. CohortConnect shows an error message.
- Use case ends.
- 2a. The list is empty.
- Use case ends.
Use Case 9: Find a contact by GitHub username
MSS
- User enters command to find a contact by GitHub username.
-
CohortConnect shows list of contacts with matching GitHub username.
Use case ends.
Extensions
- 1a. The input command is invalid.
- 1a1. CohortConnect shows an error message.
- 1a2. CohortConnect requests for correct format.
- 1a3. User enters new data.
- 1a1-1a3 are repeated until the data entered are valid.
- Use case resumes from step 2.
- 1b. Contact with this GitHub username does not exist.
- 1b1. CohortConnect shows an error message.
- Use case ends.
- 2a. The list is empty.
- Use case ends.
Use Case 10: Find a contact by Telegram handle
MSS
- User enters command to find a contact by Telegram handle.
-
CohortConnect shows list of contacts with matching Telegram handle.
Use case ends.
Extensions
- 1a. The input command is invalid.
- 1a1. CohortConnect shows an error message.
- 1a2. CohortConnect requests for correct format.
- 1a3. User enters new data.
- 1a1-1a3 are repeated until the data entered are valid.
- Use case resumes from step 2.
- 1b. Contact with this Telegram handle does not exist.
- 1b1. CohortConnect shows an error message.
- Use case ends.
- 2a. The list is empty.
- Use case ends.
Use Case 11: Find a contact using tag
MSS
- User enters command to find a contact by tag.
-
CohortConnect shows list of contacts labelled with matching tag.
Use case ends.
Extensions
- 1a. The input command is invalid.
- 1a1. CohortConnect shows an error message.
- 1a2. CohortConnect requests for correct format.
- 1a3. User enters new data.
- 1a1-1a3 are repeated until the data entered are valid.
- Use case resumes from step 2.
- 1b. Contact with this tag does not exist.
- 1b1. CohortConnect shows an error message.
- Use case ends.
- 2a. The list is empty.
- Use case ends.
Use Case 12: Show a person’s details using Index
MSS
- User requests to list persons.
- CohortConnect shows a list of persons.
- User requests to show details of person at a specific index in the list.
-
CohortConnect shows a pop-up with the person’s details.
Use case ends.
Extensions
- 1a. The given arguments are incorrectly formatted.
- 1a1. CohortConnect shows an error message.
- 1a2. CohortConnect requests for correct format.
- 1a3. User enters new data.
- Steps 1a1-1a3 are repeated until the data entered are valid.
- Use case resumes from step 2.
- 2a. The list is empty.
- Use case ends.
- 3a. The given index is invalid.
- 3a1. CohortConnect shows an error message.
- Use case resumes at step 3.
Use Case 13: Show a person’s details using Name
MSS
- User requests to list persons.
- CohortConnect shows a list of persons.
- User requests to show details of a specific person in the list using the name.
-
CohortConnect shows the person’s details in the detail pane.
Use case ends.
Extensions
- 1a. The given arguments are incorrectly formatted.
- 1a1. CohortConnect shows an error message.
- 1a2. CohortConnect requests for correct format.
- 1a3. User enters new data.
- Steps 1a1-1a3 are repeated until the data entered are valid.
- Use case resumes from step 2.
- 2a. The list is empty.
- Use case ends.
- 3a. The given name is not present.
- 3a1. CohortConnect shows an error message.
- Use case resumes at step 3.
- 3b. Multiple matching names.
- 3b1. CohortConnect shows an error message.
- 3b2. Displays list of users with names containing the keyword.
- Use case resumes at step 3.
Use Case 14: Show a person’s details using GitHub Username
MSS
- User requests to list persons.
- CohortConnect shows a list of persons.
- User requests to show details of a specific person in the list using GitHub username.
-
CohortConnect shows the person’s details in the detail pane.
Use case ends.
Extensions
- 1a. The given arguments are incorrectly formatted.
- 1a1. CohortConnect shows an error message.
- 1a2. CohortConnect requests for correct format.
- 1a3. User enters new data.
- Steps 1a1-1a3 are repeated until the data entered are valid.
- Use case resumes from step 2.
- 2a. The list is empty.
- Use case ends.
- 3a. The given GitHub username is not present.
- 3a1. CohortConnect shows an error message.
- Use case resumes at step 3.
- 3b. Multiple matching GitHub usernames.
- 3b1. CohortConnect shows an error message.
- 3b2. Displays list of users with GitHub usernames containing the keyword.
- Use case resumes at step 3.
Use Case 15: Show a person’s details using Telegram Username
MSS
- User requests to list persons.
- CohortConnect shows a list of persons.
- User requests to show details of a specific person in the list using Telegram Username.
-
CohortConnect shows the person’s details in the detail pane.
Use case ends.
Extensions
- 1a. The given arguments are incorrectly formatted.
- 1a1. CohortConnect shows an error message.
- 1a2. CohortConnect requests for correct format.
- 1a3. User enters new data.
- Steps 1a1-1a3 are repeated until the data entered are valid.
- Use case resumes from step 2.
- 2a. The list is empty.
- Use case ends.
- 3a. The given telegram id is not present.
- 3a1. CohortConnect shows an error message.
- Use case resumes at step 3.
- 3b. Multiple matching telegram ids.
- 3b1. CohortConnect shows an error message.
- 3b2. Displays list of users with telegram ids containing the keyword.
- Use case resumes at step 3.
Use Case 16: Favorite an existing contact
MSS
- User enters command to favorite a contact.
- CohortConnect shows a successfully favorited message.
-
CohortConnect shows the updated list of contacts.
Use case ends.
Extensions
- 1a. The given index is not present.
- 1a1. CohortConnect shows an error message.
- 1a2. CohortConnect requests for correct format.
- 1a3. User enters new data.
- Steps 1a1-1a3 are repeated until the data entered are valid.
- Use case resumes from step 2.
- 1b. The given arguments are incorrectly formatted.
- 1b1. CohortConnect shows an error message.
- 1b2. CohortConnect requests for correct format.
- 1b3. User enters new data.
- Steps 1b1-1b3 are repeated until the data entered are valid.
- Use case resumes from step 2.
- 1c. The contact at given index is already favorited.
- 1c1. CohortConnect shows an error message.
- 1c2. User enters new data.
- Steps 1c1-1c2 are repeated until the data entered are valid.
- Use case resumes from step 2.
Use Case 17: Unfavorite an existing contact
MSS
- User enters command to unfavorite a contact.
- CohortConnect shows a successfully unfavorited message.
-
CohortConnect shows the updated list of contacts.
Use case ends.
Extensions
- 1a. The given index is not present.
- 1a1. CohortConnect shows an error message.
- 1a2. CohortConnect requests for correct format.
- 1a3. User enters new data.
- Steps 1a1-1a3 are repeated until the data entered are valid.
- Use case resumes from step 2.
- 1b. The given arguments are incorrectly formatted.
- 1b1. CohortConnect shows an error message.
- 1b2. CohortConnect requests for correct format.
- 1b3. User enters new data.
- Steps 1b1-1b3 are repeated until the data entered are valid.
- Use case resumes from step 2.
- 1c. The contact at given index is already favorited.
- 1c1. CohortConnect shows an error message.
- 1c2. User enters new data.
- Steps 1c1-1c2 are repeated until the data entered are valid.
- Use case resumes from step 2.
Use Case 18: Import contacts from JSON or CSV file
MSS
- User enters command to import from a JSON or CSV file.
-
CohortConnect shows the updated list of contacts.
Use case ends.
Extensions
- 1a. CohortConnect cannot find the JSON or CSV file.
- 1a1. CohortConnect shows an error message.
- 1a2. User enters new filename.
- Steps 1a1-1a2 are repeated until the filename received is valid.
- 1b. Filename entered does not end with
.jsonor.csv- 1b1. CohortConnect shows an error message.
- 1b3. User enters new filename.
- Steps 1b1-1b2 are repeated until the filename received is valid.
- 1c. The JSON or CSV file is formatted wrongly.
- 1c1. CohortConnect shows an error message.
Use case ends.
Use Case 19: Export contacts to JSON or CSV file
MSS
- User enters command to export contacts to a named JSON or CSV file.
-
CohortConnect shows a success message.
Use case ends.
Extensions
- 1a. File name already exists.
- 1a1. CohortConnect shows an error message.
- 1a2. CohortConnect prompts for new filename.
- 1a3. User enters new filename.
- Steps 1a1-1a3 are repeated until the filename received is valid.
- 1b. The given arguments are incorrectly formatted.
- 1b1. CohortConnect shows an error message.
- 1b2. CohortConnect requests for correct format.
- 1b3. User enters new data.
- Steps 1b1-1b3 are repeated until the data entered are valid.
- Use case resumes from step 2.
Use Case 20: Opening a contact’s GitHub
MSS
- User navigates to the contact using Find (UC8-11) and / or Show command (UC12-15).
- User clicks on the contact’s GitHub username, or enters the command to open GitHub page.
-
The contact’s GitHub profile is shown in a new browser.
Use case ends.
Extensions
- 2a. The contact list is empty and the user enters the GitHub command.
- 2a1. CohortConnect shows an error message prompting the user to select a user.
Use case ends.
- 2b. The contact list is empty and the user tries to click the GitHub username.
- 2b1. The contact details will be empty and there will be nothing for the user to click.
Use case ends.
- 2c. The contact has an invalid GitHub username.
- 2c1. The browser shows GitHub’s 404 page.
Use case ends.
Use Case 21: Opening a contact’s Telegram
MSS
- User navigates to the contact using Find (UC8-11) and / or Show command (UC12-15).
- User clicks on the contact’s Telegram username, or enters the command to open Telegram.
-
The contact’s Telegram profile is shown in a browser window, and redirected to the Telegram app if it is installed.
Use case ends.
Extensions
- 2a. The contact list is empty and the user enters the Telegram command.
-
2a1. CohortConnect shows an error message prompting the user to select a user.
Use case ends.
-
- 2b. The contact list is empty and the user tries to click the Telegram username.
-
2b1. The contact details will be empty and there will be nothing for the user to click.
Use case ends.
-
- 2c. The contact has an invalid Telegram username.
-
2c1. The invalid Telegram profile is shown in the browser window, and Telegram shows an error message when opening the profile in the Telegram application.
Use case ends.
-
Use Case 22: Using the Find A Buddy Feature
MSS
- User switches to the Find A Buddy Tab
- CohortConnect gives the top 5 matches to your data
Extensions
- 1a. GitHub data is still being gathered.
- 1a1. CohortConnect shows a loading screen while gathering data in the background.
- 1a2. Once loaded, Use case resumes at Step 2
Use Case 23: Opening the Help Window
MSS
- User uses the keyboard shortcut, or types in the command, or clicks on help in the Menu Bar.
-
CohortConnect shows the Help Window.
Use case ends.
Extensions
- 1a. User types in command with wrong format.
- 1a1. CohortConnect shows an error message.
- 1a2. CohortConnect requests for correct format.
- 1a3. User enters new data.
- Steps 1a1-1a3 are repeated until the data entered are valid.
- Use case resumes from step 2.
- *a. At any time, the User chooses to close the app.
-
*a1. CohortConnect closes.
Use case ends.
-
Non-Functional Requirements
- Should work on any mainstream OS as long as it has Java
11or above installed. - Should be able to hold up to 1000 persons without a noticeable sluggishness in performance for typical usage.
- A user with above average typing speed for regular English text (i.e. not code, not system admin commands) should be able to accomplish most of the tasks faster using commands than using the mouse.
- Data should be saved locally.
- Product is not required to handle communication between users.
Glossary
- Mainstream OS: Windows, Linux, Unix, OS-X
- Private contact detail: A contact detail that is not meant to be shared with others
- Main Success Scenario (MSS): The most straightforward interaction for a given use case, which assumes that nothing goes wrong.
- JSON: JavaScript Object Notation, is a common file format which stores data in key-value pairs and arrays.
- Regex: Regular Expression
Appendix: Instructions for manual testing
Given below are instructions to test the app manually.
Launch and shutdown
-
Initial launch
-
Download the jar file and copy into an empty folder
-
Double-click the jar file Expected: Shows the GUI with a set of sample contacts. The window size may not be optimum.
-
-
Saving window preferences
-
Resize the window to an optimum size. Move the window to a different location. Close the window.
-
Re-launch the app by double-clicking the jar file.
Expected: The most recent window size and location is retained.
-
Deleting a person
-
Deleting a person while all persons are being shown
-
Prerequisites: List all persons using the
listcommand. Multiple persons in the list. -
Test case:
delete 1
Expected: First contact is deleted from the list. Details of the deleted contact shown in the status message. Timestamp in the status bar is updated. -
Test case:
delete 0
Expected: No person is deleted. Error details shown in the status message. Status bar remains the same. -
Other incorrect delete commands to try:
delete,delete x,...(where x is larger than the list size)
Expected: Similar to previous.
-
Saving data
-
Dealing with missing/corrupted data files
-
Navigate to and open
/data/addressbook.jsonin a text editor. -
Delete one line of code from a Person object, such as
"name" : "Alex Yeoh". -
Restart CohortConnect.
-
CohortConnect will start with no contacts.
-
An error message will be shown in the
ResultDisplay, stating that the file is corrupted.
-